Edge history forensics – part 2 (downloads and search)

I have not been feeling well the last few days, and taken some sick days. The upside of that is time on the coach researching stuff on my laptop without needing to be “productive”. Yesterday I did a dive into the History file in Edge, looking at how URL’s and browser history is saved. Today I decided to continue that expedition a bit, to look into the downloads history, as well as search terms typed into the address bar.

Downloads – when did they happen?

Sometimes you would like to investigate which files have been downloaded on a computer. A natural way to do this is to look in the downloads folder of the user. However, if the files have been deleted from that folder, it may not be so easy to figure out what has happened. A typical malware infection could be to trick someone into downloading a malicious file and then executing it.

We found a suspicious file - and we believe a search led to this one.

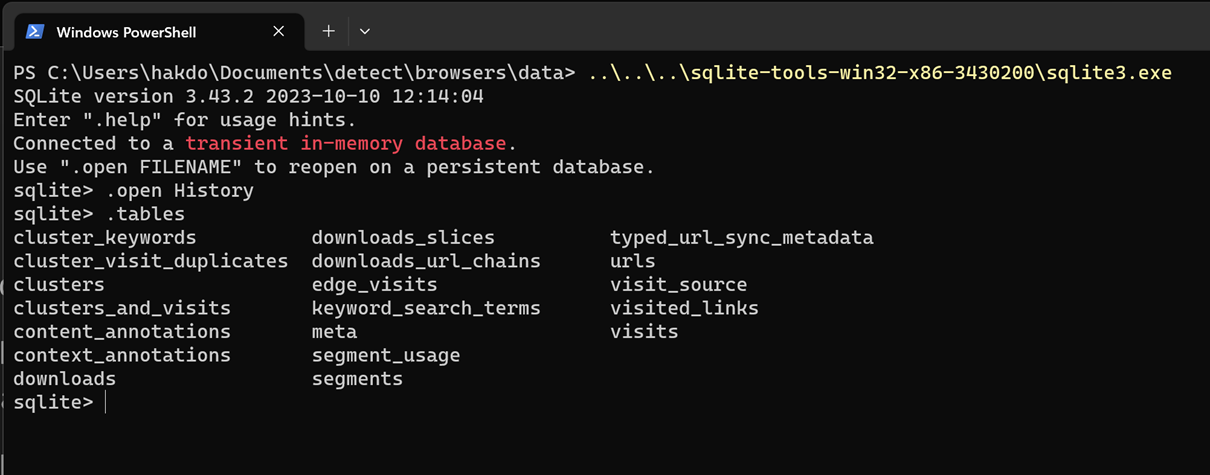
If we again turn to the History file of Edge, we can check out the downloads table. It has a lot of fields, but some of the interesting ones are:

  • id
  • target_path
  • start_time
  • tab_url

Immediately interesting property for forensics investigations is that we can check with start_time when the download occurred. We also have access to the URL of the download, from tab_url, as well as where it was linked from.

To test how well this works, I am going to download a file to a non-standard location.

select id, tab_url, target_path, datetime(start_time/1000000 + (strftime('%s','1601-01-01')),'unixepoch','localtime') from downloads;

The result is:

6|https://snabelen.no/deck/@eselet/111257537583580387|C:\Users\hakdo\Documents\temp\HubSpot 2023 Sustainability Report_FINAL.pdf|2023-10-18 20:55:16

This means that I downloaded the file from a Mastodon post link, but this is not the origin of the file.

Private mastodon post used as example of link to a file that can be downloaded

It seems we are able to get the actual download URL from the downloads_url_chain table. This table seems to have the same id as the downloads table.

sqlite> select id, tab_url from downloads where id=6;

6|https://snabelen.no/deck/@eselet/111257537583580387

sqlite> select * from downloads_url_chains where id=6;

6|0|https://www.hubspot.com/hubfs/HubSpot%202023%20Sustainability%20Report_FINAL.pdf

Then we have the full download link.

In other words, we can based on these tables get:

  • When the download occurred
  • Where it was stored on the computer
  • What page the link was clicked on
  • What the URL of the downloaded file was

That is quite useful!

Searches typed into the address bar

The next topic we look at is the table keyword_search_terms. This seems to be the keywords typed into the address bar of the Edge browser to search for things. The schema shows two column names of particular interest: url_id, term. The url_id only gives us the ID from the urls table, so we need to use an inner join here to find the actual search string. Here’s an example:

sqlite> select term, url_id, url from keyword_search_terms inner join urls on urls.id=keyword_search_terms.url_id order by id desc limit 1;

The result is:

site:hubspot.com filetype:pdf|801|https://www.bing.com/search?q=site%3Ahubspot.com+filetype%3Apdf&cvid=1357bb7a2e544bb2bda6d557120ccf8c&gs_lcrp=EgZjaHJvbWUyBggAEEUYOTIGCAEQRRg60gEJMjIzNjdqMGo5qAIAsAIA&FORM=ANAB01&PC=ACTS

Going through someone’s search terms is of course quite invasive, and we should only do that when properly justified and with a sound legal basis. Here are some situations where I think this could be helpful and acceptable:

  • There has been an insider incident, and you are investigating the workstation used by the insider. Probably still will require that the end user is informed, perhaps also concent, depending on the legal requirements at your location
  • An endpoint was compromised through a malicious download, and the link to the download came from a search engine. The attacker may have used malicious search engine optimization to plant malicious links on a search engine page

Here’s a potential case where you may want to have a look at the search terms. A user downloaded a malicious document and executed it. When investigating, you found out that the link came from a search engine result page. You would like to check the searches done that led to this page, as the malware may have been targeting specific searches to your business or business sector.

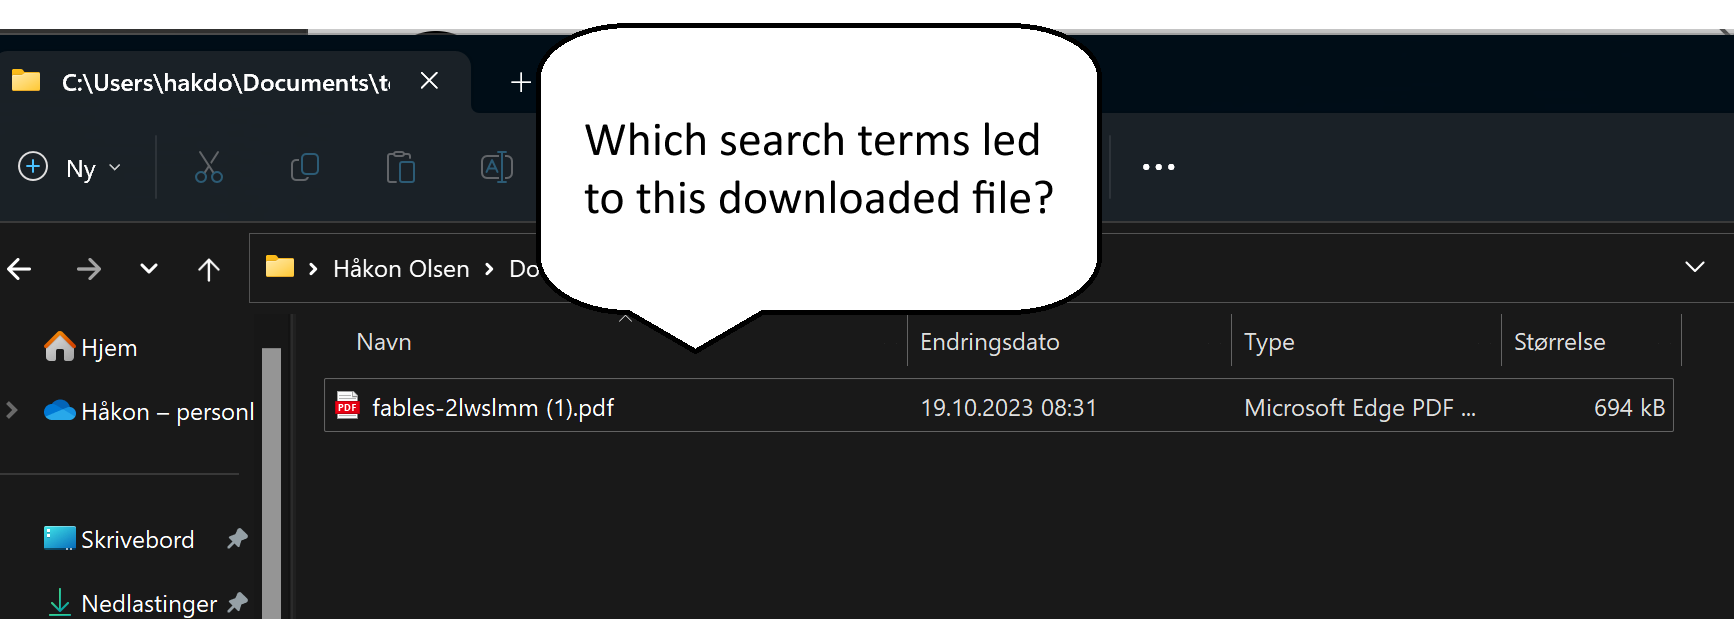
For the sake of the example I now changed the default search engine in Edge from Bing to Duckduckgo. Then I did a search and downloaded a PDF file directly from the search results. Using an SQL search to find the latest download we get:

sqlite> select id, tab_url, target_path, referrer from downloads order by id desc limit 1;
8|https://duckduckgo.com/?q=evil+donkey+filetype%3Apdf&ia=web|C:\Users\hakdo\Documents\temp\fables-2lwslmm (1).pdf|https://duckduckgo.com/

Then we may want to know where this file came from, and again we turn to the downloads_url_chains table:

select * from downloads_url_chains where id=8;
8|0|https://cpb-us-w2.wpmucdn.com/blogs.egusd.net/dist/e/211/files/2012/07/fables-2lwslmm.pdf

Now we know already here what has been downloaded. We can also see from the query string above what the search terms were (“evil donkey” and “filetype:pdf”). If we have reason to believe that the attacker has poisoned results relating to evil donkey searches, we may want to look at the searches done by the user.

sqlite> select * from keyword_search_terms where term like '%donkey%';

5|819|evil donkey filetype:pdf|evil donkey filetype:pdf

5|820|evil donkey filetype:pdf|evil donkey filetype:pdf

That is one specific search – if searching for “evil donkeys” is something that this company could be expected to do, but would in general be very unusual (I suspect it its), this could be an initial delivery vector using malicious SEO.

Note that the default behavior in Edge is to open a PDF directly in the browser, not to download it. In this case, the search engine URL would not show up as referrer in the downloads record, but the direct link to the document on the Internet.

The second column in the result above is a reference to the ID in the urls table, so more information about the search performed (including time it was executed) can be found there. For example, if we want to know exactly when the user searched for evil donkeys, we can ask the urls table for this information.

select datetime(last_visit_time/1000000 + (strftime('%s','1601-01-01')),'unixepoch','localtime') from urls where id=819;

The answer is that this search was executed at:

2023-10-19 08:31:28

I hope you enjoyed that little browser History file dissection – I know a lot more about how Edge manages browser history data now at least.

Edge browser history forensics

Note that there are forensics tools that will make browser history forensics easy to do. This is mostly for learning, but for real incident handling and forensics using an established tool will be a much faster route to results!

Basics

The edge browser history is stored in a sqlite3 database under each user profile. You find this database as C:\Users\<username>\AppData\Local\Microsoft\Edge\User Data\Default\History

The “History” file is a sqlite3 database, and you can analyse the database using the sqlite3 shell utility, that can be downloaded from here: SQLite Download Page.

If we list the tables in the database, we see there are quite a few.

screeshot terminal showing tables of HIstory sqlite3 database

Several of these seem quite interesting. The “urls” table seems to contain all the visited URL’s that exist in the browser history. Looking at the schema of this table shows that we can also here see the “last visited” timestamp, which can be useful.

sqlite> .schema urls
CREATE TABLE urls(id INTEGER PRIMARY KEY AUTOINCREMENT,url LONGVARCHAR,title LONGVARCHAR,visit_count INTEGER DEFAULT 0 NOT NULL,typed_count INTEGER DEFAULT 0 NOT NULL,last_visit_time INTEGER NOT NULL,hidden INTEGER DEFAULT 0 NOT NULL);
CREATE INDEX urls_url_index ON urls (url);

It can also be interesting to check out the visit_count.  For example, in the history file I am looking at, the top 3 visited URL’s are:

sqlite> select url, visit_count from urls order by visit_count desc limit 3;

https://www.linkedin.com/|24

https://www.linkedin.com/feed/|15

https://www.vg.no/|14

Another table that is interesting is, “visits”. This table has the following fields (among many, use .schema to inspect the full set of columns):

  • url
  • visit_time
  • visit_duration

The visits table contains mostly references to other tables:

sqlite> select * from visits where id=1;

1|1|13341690141373445|0||805306368|0|0|0|0||0|0|0|0|1|

To get more useful data out of this, we need to use some join queries. For example, if I would like to know which URL was last visited I could do this:

select visit_time, urls.url from visits inner join urls on urls.id = visits.url order by visit_time desc limit 1;

13342089225183294|https://docs.python.org/3/library/sqlite3.html

The time stamp is not very reader friendly, and it appears to be the number of microseconds since midnight January 1, 1601. sqlite – What is the format of Chrome’s timestamps? – Stack Overflow. This value has the same basis, but different counting from than Windows File Time File Times – Win32 apps | Microsoft Learn.

So.. at what times did I visit the Python docs page? The good news is that sqlite3 contains a datetime function that allows us to convert to human readable form directly in the query:

sqlite> SELECT
   ...>   datetime(visit_time / 1000000 + (strftime('%s', '1601-01-01')), 'unixepoch', 'localtime'), urls.url
   ...> FROM visits
   ...> INNER JOIN urls
   ...>   ON urls.id = visits.url
   ...> WHERE
   ...>   urls.url LIKE '%python.org%'
   ...> ORDER BY visit_time DESC
   ...> LIMIT 3;

2023-10-18 09:53:45|https://docs.python.org/3/library/sqlite3.html

2023-10-17 10:01:54|https://docs.python.org/3/library/subprocess.html

2023-10-17 09:58:51|https://docs.python.org/3/library/subprocess.html

Making some scripts

Typing all of this into the shell can be a bit tedious and difficult to remember. It could be handy to have a script to help with some of these queries. During incident handling, there are some typical questions about web browsing that tend to show up:

  1. When did the user click the phishing link?
  2. What files were downloaded?
  3. What was the origin of the link?

If we now try to make a small Python utility to figure out when a link has been visited, this could be a useful little tool. We concentrate on the first of the questions above for now – we have a URL, and want to check if it has been visited, and what the last visit time was.

Such a script can be found here: cbtools/phishtime.py at main · hakdo/cbtools (github.com).

Phishing investigation

Consider a hypothetical case, where we know that a user has visited a phishing link from his home computer, and that this led to a compromise, that later moved into the corporate environment. The user has been so friendly as to allow us to review his Edge history database.

We know from investigation of other similar cases that payloads are often sent with links to Pastebin content. We therefore want to search for “pastebin.com” in the URL history.

We copy over the History file to an evidence folder before working on it (to make sure we don’t cause any problems for the browser). It is a good idea to document the evidence capture, with a hash, timestamp, who did it etc.

Then we run our little Python script, looking for Pastebin references in the urls table. The command we use is

python phishtime.py History pastebin.com 2

The result of the query gives us two informative lines:

2023-10-18 12:42:37  hxxps://pastebin.com/raw/k3NjT2Cp

2023-10-18 12:42:37  hxxps://www.google.com/url?q=https://pastebin.com/raw/k3NjT2Cp&source=gmail&ust=1697712137533000&usg=AOvVaw1TK8-pr8-7Xsp8BG72hbP5

From this we quickly conclude that there was a Pastebin link provided, and that the user clicked this phishing link from his Gmail account.

Don’t miss interesting posts – subscribe!

You may also want to read part 2 of this post – Edge history forensics – part 2 (downloads and search).

Cyber incident response training with Azure Labs

I have been planning an internal incident response training at work, and was considering how to create environments for participants to work on. At first I was planning to create some VM’s, a virtual network, etc., and export a template for easy deployment by each participant. The downside of this, is complexity. Not everyone is equally skilled with cloud tech, and it can also be hard to monitor how the participants are doing.

While planning this I came across Azure Labs. This is a setup to create temporary environments for training, replicated to multiple users. Looks perfect! I started by creating a lab, only to discover that it did need a bit more of config to get it working.

The scenario is this: a Windows machine works as an engineering workstation in a network. A laptop in the office network is compromised. RDP from the office network to the OT network is allowed, and the attacker runs an nmap scan for host discovery after compromising the office host, and then uses a brute-force attack to get onto the engineering workstation. On that machine the attacker establishes persistence, and edits some important config files. The participants will work as responders, and will perform analysis on the compromised engineering workstation. They should not have access to the office computer.

The first lab I created by just clicking through the obvious things, with default settings. Then I got a Windows 11 VM, but it had no internal network connectivity. After searching for a way to add a subnet to the lab, I found this article: Create lab with advanced networking. The summary notes are as follows:

  • Create a new resource group
  • Create a Vnet + subnet
  • Create a network security group
  • Associate the subnet with Azure labs
  • Create a new lab plan and choose “advanced networking”
  • Ready to create new labs!

With all this in place we could create a new lab. We need to choose to customize the VM to prepare the forensic evidence. We can run it as a template, and install things on it, do things to it, before we publish it to use in a training. This way we will have disk, memory and log artifacts ready to go.

If we want ping to work (and we do), we also need to change the Windows firewall settings on the VM, because Azure VM’s block pings by default. Blog post with details here. Tl;dr:

# For IPv4
netsh advfirewall firewall add rule name="ICMP Allow incoming V4 echo request" protocol="icmpv4:8,any" dir=in action=allow

netsh advfirewall firewall add rule name="ICMP Allow outgoing V4 echo request" protocol="icmpv4:8,any" dir=out action=allow
 

If you want to allow ping to/from the Internet, you will also have to allow that in the network security group. I don’t need that for my lab, so I didn’t do that.

We also needed an attacker. For this we created a new VM in Azure the normal way, in the same resource group used for the lab, and associating it to the same Vnet. From this attacker, we can run nmap, brute-force attacks, etc.

Then our lab is ready to publish, and we can just wait for our training event to start. Will it be a success? Time will show!

Create a Google Site with a section requiring authentication with Forms, Sheets & App Script

If you Google “how to add login to a Google Site” you get many hits for questions and few answers. I wondered if we could somehow create a Google Site with access control for a “member’s area”. Turns out, you can’t really do that. We can, however, simulate that behavior by creating two sites, where one contains the “public pages” and another one the “private pages”.

First, we create a site that we want to be public. Here’s an example of a published Google Site: https://sites.google.com/view/donkeytest/start. We publish this one as visible for everyone.

Publish dialog (in Norwegian) – showing access for all for our public page.

Now, create a folder to contain another site, which will be your membership site.

Membership site in its own folder

This one is published only to “specific persons”. These people will need to have Google accounts to access the membership site. Now, we can add new users by using the sharing functions in Google Drive, but we want it to be a bit more automated. This is the reason we put the site in its own folder.

Google used to have a version of Google Sites that could be scripted, but that version is now considered legacy. There is a new version of Google Sites that we are using but that one cannot be scripted. However, we can manipulate permissions for a folder in Google Drive using App Script, and permissions are hierarchical.

Let’s assume our users have received an access code that grants them access to the site, for example in a purchase process. We can create a Google Form for people to get access after obtaining this code. They will have to add their Gmail address + the secret access code.

Signup form for our membership page (also in Norwegian, tilgangskode = access code)

When the user submits this form, we need to process it and grant access to the parent folder of our membership site. First, make sure you go into the answers section, and click the “Google Sheet” symbol to create a Sheet for containing the signups.

Click the green Sheet symbol to create a Google Sheet to hold signup answers.

In Sheets, we create two extra tabs – one for the “secret access code”, and another for a block list in case there are users we want to deny signing up. To make the data from the spreadsheet accessible to Google App Script, we now click the Google App Script link on the Extensions menu in the Google Sheet.

Go to App Script!

Don’t miss future secure and tech posts – sign up here to be notified!

In App Script, we add the Sheets + Gmail services. We create a function to be triggered each time the form is submitted. Our function is called onFormSubmit. We click the “trigger button” in the editor to add a trigger to make this happen.

Trigger button looks like a clock!

In the trigger config, choose trigger source to be “spreadsheet”, and event type to “form submission”. Now the trigger is done, and it is time to write some code. In pseudocode form, this is what needs to happen:

  • Get the e-mail address of the new user + the access code submitted by the user
  • Check if the access code is correct
    • If correct, check if the user is on a block list. If the user is not blocked, grant access to the parent folder of the membership site using the Google Drive service. Send an e-mail to the user that access has been granted.
    • If incorrect, don’t grant access. Perhaps log the event

The App Script code is just JavaScript. Here’s our implementation.

function onFormSubmit(event) {
  var useremail = event.values[1]
  var accesscode = event.values[2]
  var correctcode = sheetTest()
  var blocked = getBlockedUsers()
  console.log(blocked)
  if (accesscode == correctcode) {
    if (blocked.flat().includes(useremail)) {
      Logger.log("Blocked user is attempting access: " + useremail)
    } else {
      Logger.log("Provide user with access: " + useremail)
      var secretfolder = DriveApp.getFolderById("<id-of-folder>")
      secretfolder.addViewer(useremail)
      GmailApp.sendEmail(useremail, "Access to Membership Site", "Body text for email goes here...")
    }
  } else {
    Logger.log("Deny user access")
  }
}

function sheetTest() {
  var sheet = SpreadsheetApp.openById("<Spreadsheet-ID>");
  var thiscell = sheet.getSheets()[1].getDataRange().getValues()
  var correctcode = thiscell[thiscell.length-1][0];
  return correctcode
}

function getBlockedUsers() {
  var sheet = SpreadsheetApp.openById("<Spreadsheet-ID>");
  var blocklist = sheet.getSheets()[2].getDataRange().getValues()
  return blocklist
}

Now, we are done with the “backend”. We can now create links in the navigation menus between the public site and the membership one, and you will have a functioning Google Site with a membership area as seen from the user’s point of view.

Threat hunting using PowerShell and Event Logs

Modern operating systems have robust systems for creating audit trails built-in. They are very useful for detecting attacks, and understanding what has happened on a machine.

To make sense of the crime you need evidence. Ensure you capture enough logs to handle relevant threat scenarios against your assets.

Not all the features that are useful for security monitoring are turned on by default – you need to plan auditing. The more you audit, the more visibility you gain in theory, but there are trade-offs.

  • More data gives you more data – and more noise. Logging more than you need makes it harder to find the events that matter
  • More data can be useful for visibility, but can also quickly fill up your disk with logs if you turn on too much
  • More data can give you increased visibility of what is going on, but this can be at odds with privacy requirements and expectations

Brute-force attacks: export data and use Excel to make sense of it

Brute-force attacks are popular among attackers, because there are many systems using weak passwords and that are lacking reasonable password policies. You can easily defend against naive brute-force attacks using rate limiting and account lockouts.

If you expose your computer directly on the Internet on port 3389 (RDP), you will quickly see thousands of login attempts. The obvious answer to this problem is to avoid exposing RDP directly on the Internet. This will also cut away a lot of the noise, making it easier to detect actual intrusions.

Logon attempts on Windows will generate Event ID 4625 for failed logons, and Event ID 4624 for successful logons. An easy way to detect naive attacks is thus to look for a series of failed attempts in a short time for the same username, followed by a successful logon for the same user. A practical way to do this, is to use PowerShell to extract the relevant data, and export it to a csv file. You can then import the data to Excel for easy analysis.

For a system exposed on the Internet, there will be thousands of logons for various users. Exporting data for non-existent users makes no sense (this is noise), so it can be a good idea to pull out the users first. If we are interested in detecting attacks on local users on a machine, we can use the following Cmdlet:

$users = @()
$users += (Get-LocalUser|Where-Object {$_.Enabled})| ForEach-Object {$_.Name}

Now we first fetch the logs with Event ID’s 4624, 4625. You need to do this from an elevated shell to read the events from the Windows security log. For more details on scripting log analysis and making sense of the XML log format that Windows is using, please refer to this excellent blog post: How to track Windows events with Powershell.

$events = Get-WinEvent -FilterHashTable @{LogName="Security";ID=4624,4625;StartTime=((Get-Date).AddDays(-1).Date);EndTime=(Get-Date)}

Now we can loop over the $events variable and pull out the relevant data. Note that we check that the logon attempt is for a target account that is a valid user account on our system.

$events | ForEach-Object {
    if($_.properties[5].value -in $users) {
        if ($_.ID -eq 4625) {
            [PSCustomObject]@{     
                TimeCreated = $_.TimeCreated
                EventID = $_.ID     
                TargetUserName = $_.properties[5].value     
                WorkstationName = $_.properties[13].value     
                IpAddress = $_.properties[19].value
            }
        } else {
            [PSCustomObject]@{     
                TimeCreated = $_.TimeCreated
                EventID = $_.ID     
                TargetUserName = $_.properties[5].value
                WorkstationName = $_.properties[11].value     
                IpAddress = $_.properties[18].value
            }
        }
    } 
} | Export-Csv -Path <filepath\myoutput.csv>

Now we can import the data in Excel to analyze it. We have detected there are many logon attempts for the username “victim”, and filtering on this value clearly shows what has happened.

TimeCreatedEventIDTargetUserNameLogonTypeWorkstationNameIpAddress
3/6/2022 9:26:54 PM4624victimNetworkWinDev2202EvalREDACTED
3/6/2022 9:26:54 PM4625victimNetworkWinDev2202EvalREDACTED
3/6/2022 9:26:53 PM4625victimNetworkWinDev2202EvalREDACTED
3/6/2022 9:23:38 PM4625victimNetworkWinDev2202EvalREDACTED
3/6/2022 9:23:37 PM4625victimNetworkWinDev2202EvalREDACTED
3/6/2022 9:23:37 PM4624victimNetworkWinDev2202EvalREDACTED
3/6/2022 9:23:37 PM4625victimNetworkWinDev2202EvalREDACTED
Log showing successful brute-force attack coming from a Windows workstation called WinDev2202Eval, with the source ip address.

Engineering visibility

The above is a simple example of how scripting can help pull out local logs. This works well for an investigation after an intrusion but you want to detect attack patterns before that. That is why you want to forward logs to a SIEM, and to create alerts based on attack patterns.

For logon events the relevant logs are created by Windows without changing audit policies. There are many other very useful security logs that can be generated on Windows, that require you to activate them. Two very useful events are the following:

  • Event ID 4688: A process was created. This can be used to capture what an attacker is doing as post-exploitation.
  • Event ID 4698: A scheduled task was created. This is good for detecting a common tactic for persistence.

Taking into account the trade-offs mentioned in the beginning of this post, turning on the necessary auditing should be part of your security strategy.

Impact of OT attacks: death, environmental disasters and collapsing supply-chains

Securing operational technologies (OT) is different from securing enterprise IT systems. Not because the technologies themselves are so different – but the consequences are. OT systems are used to control all sorts of systems we rely on for modern society to function; oil tankers, high-speed trains, nuclear power plants. What is the worst thing that could happen, if hackers take control of the information and communication technology based systems used to operate and safeguard such systems? Obviously, the consequences could be significantly worse than a data leak showing who the customers of an adult dating site are. Death is generally worse than embarrassment.

No electricity could be a consequence of an OT attack.

When people think about cybersecurity, they typically think about confidentiality. IT security professionals will take a more complete view of data security by considering not only confidentiality, but also integrity and availability. For most enterprise IT systems, the consequences of hacking are financial, and sometimes also legal. Think about data breaches involving personal data – we regularly see stories about companies and also government agencies being fined for lack of privacy protections. This kind of thinking is often brought into industrial domains; people doing risk assessments describe consequences in terms such as “unauthorized access to data” or “data could be changed be an unauthorized individual”.

The real consequences we worry about are physical. Can a targeted attack cause a major accident at an industrial plant, leaking poisonous chemicals into the surroundings or starting a huge fire? Can damage to manufacturing equipment disrupt important supply-chains, thereby causing shortages of critical goods such as fuels or food? That is the kind of consequences we should worry about, and these are the scenarios we need to use when prioritizing risks.

Let’s look at three steps we can take to make cyber risks in the physical world more tangible.

Step 1 – connect the dots in your inventory

Two important tools for cyber defenders of all types are “network topologies” and “asset inventory”. If you do not have that type of visibility in place, you can’t defend your systems. You need to know what you have to defend it. A network topology is typically a drawing showing you what your network consists of, like network segments, servers, laptops, switches, and also OT equipment like PLC’s (programmable logic curcuits), pressure transmitters and HMI’s (human-machine interfaces – typically the software used to interact with the sensors and controllers in an industrial plant). Here’s a simple example:

An example of a simplified network topology

A drawing like this would be instantly recognizable to anyone working with IT or OT systems. In addition to this, you would typically want to have an inventory describing all your hardware systems, as well as all the software running on your hardware. In an environment where things change often, this should be generated dynamically. Often, in OT systems, these will exist as static files such as Excel files, manually compiled by engineers during system design. It is highly likely to be out of date after some time due to lack of updates when changes happen.

Performing a risk assessment based on these two common descriptions is a common exercise. The problem is, that it is very hard to connect this information to the physical consequences we want to safeguard against. We need to know what the “equipment under control” is, and what it is used for. For example, the above network may be used to operate a batch chemical reactor running an exothermic reaction. That is, a reaction that produces heat. Such reactions need cooling, if not the system could overheat, and potentially explode as well if it produces gaseous products. We can’t see that information from the IT-type documentation alone; we need to connect this information to the physical world.

Let’s say the system above is controlling a reactor that has a heat-producing reaction. This reactor needs cooling, which is provided by supplying cooling water to a jacket outside the actual reactor vessel. A controller opens and closes a valve based on a temperature measurement in order to maintain a safe temperature. This controller is the “Temperature Control PLC” in the drawing above. Knowing this, makes the physical risk visible.

Without knowing what our OT system controls, we would be led to think about the CIA triad, not really considering that the real consequences could be a severe explosion that could kill nearby workers, destroy assets, release dangerous chemical to the environment, and even cause damage to neighboring properties. Unfortunately, lack of inventory control, especially connecting industrial IT systems to the physical assets they control, is a very common problem (disclaimer – this is an article from DNV, where I am employed) across many industries.

An example of a physical system: a continuously stirred-tank reactor (CSTR) for producing a chemical in a batch-type process.

Step 1 – connect the dots: For every server, switch, transmitter, PLC and so on in your network, you need to know what jobs these items are a part of performing. Only that way, you can understand the potential consequences of a cyberattack against the OT system.

Step 2 – make friends with physical domain experts

If you work in OT security, you need to master a lot of complexity. You are perhaps an expert in industrial protocols, ladder logic programming, or building adversarial threat models? Understanding the security domain is itself a challenge, and expecting security experts to also be experts in all the physical domains they touch, is unrealistic. You can’t expect OT security experts to know the details of all the technologies described as “equipment under control” in ISO standards. Should your SOC analyst be a trained chemical engineer as well as an OT security expert? Or should she know the details of steel strength decreases with a temperature increase due to being engulfed in a jet fire? Of course not – nobody can be an expert at everything.

This is why risk assessments have to be collaborative; you need to make sure you get the input from relevant disciplines when considering risk scenarios. Going back to the chemical reactor discussed above, a social engineering incident scenario could be as follows.

John, who works as a plant engineer, receives a phishing e-mail that he falls for. Believing the attachment to be a legitimate instruction of re-calibration of the temperature sensor used in the reactor cooling control system, he executes the recipe from the the attachment in the e-mail. This tells him to download a Python file from Dropbox folder, and execute it on the SCADA server. By doing so, he calibrates the temperature sensor to report 10 degrees lower temperature than what it really measures. It also installs a backdoor on the SCADA server, allowing hackers to take full control of it over the Internet.

The consequences of this could potentially overpressurizing the reactor, causing a deadly explosion. The lack of cooling on the reactor would make a chemical engineering react, and help understand the potential physical consequences. Make friends with domain experts.

Another important aspect of domain expertise, is knowing the safety barriers. The example above was lacking several safety features that would be mandatory in most locations, such as having a passive pressure-relief system that works without the involvement of any digital technologies. In many locations it is also mandatory to have a process shutdown systems, a control system with separate sensors, PLC’s and networks to intervene and stop the potential accident from happening by using actuators also put in place only for safety use, in order to avoid common cause failures between normal production systems and safety critical systems. Lack of awareness of such systems can sometimes make OT security experts exaggerate the probability of the most severe consequences.

Step 2 – Make friends with domain experts. By involving the right domain expertise, you can get a realistic picture of the physical consequences of a scenario.

Step 3 – Respond in context

If you find yourself having to defend industrial systems against attacks, you need an incident response plan. This is no different from an enterprise IT environment; you also need an incident response plan that takes the operational context into account here. A key difference, though, is that for physical plants your response plan may actually involve taking physical action, such as manually opening and closing valves. Obviously, this needs to be planned – and exercised.

If welding will be a necessary part of handling your incident, coordinating with the industrial operations side better be part of your incident response playbooks.

Even attacks that do not affect OT systems directly, may lead to operational changes in the industrial environment. Hydro, for example, was hit with a ransomware attack in 2019, crippling its enterprise IT systems. This forced the company to turn to manual operations of its aluminum production plants. This bears lessons for us all, we need to think about how to minimize impact not just after an attack, but also during the response phase, which may be quite extensive.

Scenario-based playbooks can be of great help in planning as well as execution of response. When creating the playbook we should

  • describe the scenario in sufficient detail to estimate affected systems
  • ask what it will take to return to operations if affected systems will have to be taken out of service

The latter question would be very difficult to answer for an OT security expert. Again, you need your domain expertise. In terms of the cyber incident response plan, this would lead to information on who to contact during response, who has the authority to make decision about when to move to next steps, and so on. For example, if you need to switch to manual operations in order to continue with recovery of control system ICT equipment in a safe way, this has to be part of your playbook.

Step 3 – Plan and exercise incident response playbooks together with industrial operations. If valves need to be turned, or new pipe bypasses welded on as part of your response activities, this should be part of your playbook.

OT security is about saving lives, the environment and avoiding asset damage

In the discussion above it was not much mention of the CIA triad (confidentiality, integrity and availability), although seen from the OT system point of view, that is still the level we operate at. We still need to ensure only authorized personnel has access to our systems, we need to ensure we protect data during transit and in storage, and we need to know that a packet storm isn’t going to take our industrial network down. The point we want to make is that we need to better articulate the consequences of security breaches in the OT system.

Step 1 – know what you have. It is often not enough to know what IT components you have in your system. You need to know what they are controlling too. This is important for understanding the risk related to a compromise of the asset, but also for planning how to respond to an attack.

Step 2 – make friends with domain experts. They can help you understand if a compromised asset could lead to a catastrophic scenario, and what it would take for an attacker to make that happen. Domain experts can also help you understand independent safety barriers that are part of the design, so you don’t exaggerate the probability of the worst-case scenarios.

Step 3 – plan your response with the industrial context in mind. Use the insight of domain experts (that you know are friends with) to make practical playbooks – that may include physical actions that need to be taken on the factory floor by welders or process operators.

Pointing fingers solves nothing

To build organizations with cultures that reinforce security, we need to turn from awareness training, to a holistic approach taking human performance into account. In this post, we look at performance shaping factors as part of the root cause of poor security decisions, and suggest 4 key delivery domains for improved cybersecurity performance in organizations; leadership, integrating security in work processes, getting help when needed, and finally, delivering training and content.

This is a blog post about what most people call “security awareness”. This term is terrible; being aware that security exists doesn’t really help much. I’ve called it “pointing fingers solves nothing” – because a lot of what we do to build security awareness, has little to no effect. Or sometimes, the activities we introduce can even make us more likely to get hacked!

We want organizational cultures that make us less vulnerable to cyber threats. Phishing your own employees and forcing them to click through e-learning modules about hovering links in e-mails will not give us that.

What do we actually want to achieve?

Cybersecurity has to support the business in reaching its goals. All companies have a purpose; there is a reason they exist. Why should people working at a cinema care about cybersecurity for example? Let us start with a hypothetical statement of why you started a cinema!

What does the desire to share the love of films have to do with cybersecurity? Everything!

We love film. We want everyone to be able to come here and experience the magic of the big screen, the smell of popcorn and feeling as this is the only world that exists.

Mr. Moon (Movie Theater Entrepreneur)

Running a cinema will expose you to a lot of business risks. Because of all the connected technologies we use to run our businesses, a cyber attack can disturb almost any business, including a cinema. It could stop ticket sales, and the ability to check tickets. It could cost so much money that the cinema goes bankrupt, for example through ransomware. It could lead to liability issues if a personal data breach occurs, and the data was not protected as required by law. In other words; there are many reasons for cinema entrepreneurs to care about cybersecurity!

An “awareness program” should make the cinema more resilient to cyber attacks. We want to reach a state where the following would be true:

  • We know how to integrate security into our work
  • We know how information security helps us deliver on our true purpose
  • We know how to get help with security when we need it

Knowing when and how to get help is a key cybersecurity capability

Design principles for awareness programs

We have concluded that we want security be a natural part of how we work, and that people are motivated to follow the expected practices. We also know from research that the reason people click on a phishing e-mail or postpones updating their smartphone, is not a lack of knowledge, but rather a lack of motivation to prioritize security over short-term productivity. There can be many reasons for this, ranging from lack of situational awareness to stress and lack of time.

From human factors engineering, we know that our performance at work depends on many factors. There are factors that can significantly degrade our capability to make the right decisions, despite having the knowledge required to make the right decisions. According to the SPAR-H methodology for human reliability analysis, the following PSF’s (performance shaping factors) can greatly influence our ability to make good decisions:

  • Available time
  • Stress/stressors
  • Task complexity
  • Experience and training
  • Procedures
  • Human-machine interface
  • Fitness for duty

It is thus clear that telling people to avoid clicking suspicious links in e-mails from strangers will not be enough to improve the cybersecurity performance of the organization. When we want our program to actually make our organization less likely to see severe consequences from cyber attacks we need to do more. To guide us in making such a program, I suggest the following 7 design principles for building security cultures:

  1. Management must show that security is a priority
  2. Motivation before knowledge
  3. Policies are available and understandable
  4. Culture optimizing for human reliability
  5. Do’s before don’ts
  6. Trust your own paranoia – report suspicious observations
  7. Talk the walk – keep security on the agenda

Based on these principles, we collect activities into four delivery domains for cybersecurity awareness;

  1. Leadership
  2. Work integration
  3. Access to help
  4. Training and content

The traditional “awareness” practices we all know such as threat briefs, e-learning and simulated phishing campaigns fit into the fourth domain here. Those activities can help us build cyber resilience but they do depend on the three other domains supporting the training content.

Delivery domain 1 – Leadership

Leaders play a very important role in the implementation of a security aware organization culture. The most important part of the responsibility of leaders is to motivate people to follow security practices. When leaders respect security policies, and make this visible, it inspires and nudges others to follow those practices too. Leaders should also share how security helps support the purpose of the organization. Sharing the vision is perhaps the most important internally facing job of senior management, and connecting security to that vision is an important part of the job. Without security, the vision is much more likely to never materialize, it will remain a dream.

Further, leaders should seek to draw in relevant security stories to drive motivation for good practice. When a competitor is hit with ransomware, the leader should draw focus to it internally. When the organization was subject to a targeted attack, but the attack never managed to cause any harm due to good security controls, that is also worth sharing; the security work we do every day is what allows us to keep delivering services and products to customers.

leadership wheel
The leadership wheel; building motivation for security is a continuous process

Delivery domain 2 – work integration

Integrating security practices into how we deliver work, is perhaps the most important deliberate action to take for organizations. The key tool we need to make this reality is threat modeling. We draw up the business process in a flowchart, and then start to think like an attacker. How could cyber attacks disturb or exploit our business process? Then we build the necessary controls into the process. Finally, we need to monitor if the security controls are working as intended, and improve where we see gaps. This way, security moves from something we focus on whenever we read about ransomware in the news, to something we do every day as part of our normal jobs.

Let’s take an example. At our cinema, a key business process is selling tickets to our movies. We operate in an old-fashioned way, and the only way to buy tickets is to go to the ticket booth at the entrance of the cinema and buy your ticket.

How can cyber attacks disturb ticket sales over the counter?

Let’s outline what is needed to buy a ticket:

  • A computer connected a database showing available tickets
  • Network to send confirmation of ticket purchase to the buyer
  • Printer to print paper tickets
  • A payment solution to accept credit card payments, and perhaps also cash

There are many cyber attacks that could create problems here. A ransomware attack removing the ability to operate the ticket inventory for example, or a DDoS attack stopping the system from sending ticket ocnfirmations. Also, if the computer used by the seller is also used for other things such as e-mail and internet browsing, there are even more possibilities of attacks. We can integrate some security controls into this process:

  • Use only a hardened computer for the ticket sales
  • Set up ticket inventory systems that are less vulnerable to common attacks, e.g. use a software-as-a-service solution with good security. Choosing software tools with good security posture is always a good idea.
  • Provide training to the sales personnel on common threats that could affect ticket sales, including phishing, no shadow IT usage, and how to report potential security incidents

By going through every business process like this, and looking at how we can improve the cybersecurity for each process, we help make security a part of the process, a part of how we do business. And as we know, consistency beats bursts of effort, every time.

motivational meme.
Consistency beats motivational bursts every time. Make security a part of how we do work every day, and focus on continuous improvement. That’s how we beat the bad guys, again and again.

Delivery domain 3 – access to help

Delivery domain 3 is about access to help. You don’t build security alone, we do it together. There are two different types of help you need to make available:

  • I need help to prepare so that our workflows and our knowledge is good enough. Software developers may need help from security specialists to develop threat models or improve architectures. IT departments may need help designing and setting up security tools to detect and stop attacks. These are things we do before we are attacked, and that will help us reduce the probability of a successful attack, and help us manage attacks when they happen.
  • The other type of help we need, is when we have an active attack. We need to know who to call to get help kicking the cyber adversaries out and reestablishing our business capabilities

You may have the necessary competence in your organization to both build solid security architectures (help type 1) and to respond to incidents (help type 2). If not, you may want to hire consultants to help you design the required security controls. You may also want to contract with a service provider that offers managed detection and response, where the service provider will take care of monitoring your systems and responding to attacks. You could also sign up for an incident response retainer; then you have an on-call team you can call when the cyber villains are inside your systems and causing harm.

Delivery domain 4 – training and content

Our final domain is where the content lives. This is where you provide e-learning, you do phishing simulations, and write blog posts.

About 50% of the effort done in providing the “knowledge part” of awareness training should be focused on baseline security. These are security aspects that everyone in the organization would need to know. Some typical examples of useful topics include the following:

  • Social  engineering and phishing: typical social engineering attacks and how to avoid getting tricked
  • Policies and requirements: what are the rules and requirements we need to follow?
  • Reporting and getting help: how do we report a security incident, and what happens then?
  • Threats and key controls: why do we have the controls we do and how do they help us stop attacks?
  • Shadow IT: why we should only use approved tools and systems

Simulated phishing attacks are commonly used as part of training. The effect of this is questionable if done the way most organizations do them; send out a collection of phishing e-mails and track who is clicking them, or providing credentials on a fake login page. Everyone can be tricked if the attack is credible enough, and this can quickly turn into a blame game eroding trust in the organization.

Simulated phishing can be effective to provide more practical insights into how social engineering works. In other words, if it is used as part of training, and not primarily as a measurement, it can be good. It is important to avoid “pointing fingers”, and remember that our ability to make good decisions are shaped less by knowledge than performance shaping factors. If you see that too many people are falling for phishing campaigns, consider what could be the cause of this.

When it comes to e-learning, this can be a good way to provide content to a large population, and manage the fact that people join and leave organizations all the time. E-learning content should be easy to consume, and in small enough chunks to avoid becoming a drain on people’s time.

In addition to the baseline training we have discussed here, people who are likely to be targeted with specific attacks, or whose jobs increase the chance of severe consequences of cyber attacks, should get specific training relevant to their roles. For example, a financial department’s workers with authority to pay invoices, should get training in avoiding getting tricked by fake invoices, or to fall for typical fraud types related to business payments.

The last part should close the circle by helping management provide motivation for security. Are there recent incidents managers should know about? Managers should also get security metrics that provide insight into the performance of the organization, both for communication to the people in the organization, and to know if they resources they are investing in for security are actually bringing the desired benefit.

tl;dr – key takeaways for security awareness pushers

The most important take-away from this post is the fact that people’s performance when making security decisions is shaped both by knowledge, and by performance shaping factors. Building a strong security culture should optimize for good security decisions. This means we need to take both knowledge, leadership and the working environment into account. We have suggested 7 design principles to help build awareness programs that work. The principles are:

  1. Management must show that security is a priority
  2. Motivation before knowledge
  3. Policies are available and understandable
  4. Culture optimizing for human reliability
  5. Do’s before don’ts
  6. Trust your own paranoia – report suspicious observations
  7. Talk the walk – keep security on the agenda

Based on the principles we suggested that awareness programs consider 4 delivery domains: Leadership, Work Integration, Access to Help, and Training & Content.

Bears out for honey in the pot: some statistics

This weekend I decided to do a small experiment. Create two virtual machines in the cloud, one running Windows, and one running Linux. The Windows machine exposes RDP (port 3389) to the internet. The Linux machine exposes SSH (port 22). The Windows machines sees more than 10x the brute-force attempts of the Linux machine. 

We capture logs, and watch the logon attempts. Here’s what I wanted to find out: 

  • How many login attempts do we have in 24 hours?
  • What usernames are the bad guys trying with?
  • Where are the attacks coming from?
  • Is there a difference between the two virtual machines in terms of attack frequency?

The VM’s were set up in Azure, so it was easy to instrument them using Microsoft Sentinel. This makes it easy to query the logs and create some simple statistics. 

Where are the bad bears coming from?

Let’s first have a look at the login attempts. Are all the hackers Russian bears, or are they coming from multiple places? 

Windows

On Windows we observed more than 30.000 attempts over 24 hours. The distribution of attacks that the majority came from Germany, then Belarus, followed by Russia and China. We also see that there are some attempts from many countries, all around the globe. 

Logon attempts on a Windows server over 24 hours

Linux

On Linux the situation is similar, although the Chinese bad guys are a lot more intense than the rest of them. We don’t see that massive amount of attacks from Germany on this VM. It is also less popular to attack the Linux VM: only 3000 attempts over 24 hours, about 10% of the number of login attempts observed on the Windows VM. 

Logon attempts on a Linux server over 24 hours

What’s up with all those German hackers?

The German hackers are probably not German, or human hackers. These login attempts are coming from a number of IP addresses known to belong to a known botnet. That is; these are computers in Germany infected with a virus. 

Usernames fancied by brute-force attackers

What are the usernames that attackers are trying to log in with? 

Top 5 usernames on Linux:

Top 5 usernames on Windows: 

We see that “admin” is a popular choice on both servers, which is perhaps not so surprising. On Linux the attackers seem to try a lot of typical service names, for example “ftp” as shown above. Here’s a collection of usernames seen in the logs: 

  • zabbix
  • ftp
  • postgres
  • ansible
  • tomcat
  • git
  • dell
  • oracle1
  • redmine
  • samba
  • elasticsearch
  • apache
  • mysql
  • kafka
  • mongodb
  • sonar

Perhaps it is a good idea to avoid service names as account names, although the username itself is not a protection against unauthorized access. 

There is a lot less of this in the Windows login attempts; here we primarily see variations of “administrator” and “user”. 

Tips for avoiding brute-force attackers

The most obvious way to avoid brute-force attacks from the Internet, is clearly to not put your server on the Internet. There are many design patterns that allow you to avoid exposing RDP or SSH directly on the Internet. For example:

  • Only allow access to your server from the internal network, and set up a VPN solution with multi-factor authentication to get onto the local network remotely
  • Use a bastion host solution, where access to this host is strictly controlled
  • Use an access control solution that gives access through short-lived tokens, requiring multi-factor authentication for token access. Cloud providers have services of this type, such as just-in-time access on Azure or OS Login on GCP.

Firebase: Does serverless mean securityless?

Do you like quizzes or capture the flag (CTF) exercises? Imagine we want to build a platform for creating a capture the flag exercise! We need the platform to present a challenge. When users solve the challenge, they find a “flag”, which can be a secret word or a random string. They should then be able to submit the flag in our CTF platform and check if it is correct or not. 

Red flag
Capture the flag can be fun: looking for a hidden flag whether physically or on a computer

To do this, we need a web server to host the CTF website, and we need a database to store challenges. We also need some functionality to check if we have found the right flag. 

Firebase is a popular collection of serverless services from Google. It offers various easy to use solutions for quickly assembling applications for web or mobile, storing data, messaging, authentication, and so on. If you want to set up a basic web application with authentication and data storage without setting up backends, it is a good choice. Let’s create our CTF proof-of-concept on Firebase using Hosting + Firestore for data storage. Good for us, Google has created very readable documentation for how to add Firebase to web projects.

Firestore is a serverless NoSQL database solution that is part of Firebase. There are basically two ways of accessing the data in Firebase: 

  • Directly from the frontend. The data is protected by Firestore security rules
  • Via an admin SDK meant for use on a server. By default the SDK has full access to everything in Firestore

We don’t want to use a server, so we’ll work with the JavaScript SDK for the frontend. Here are the user stories we want to create: 

  • As an organizer I  want to create a CTF challenge in the platform and store it in Firebase so other users can find it and solve the challenge
  • As a player I want to view a challenge so that 
  • As a player I want to create a form to submit a flag to check that it is correct

We want to avoid using a server, and we are simply using the JavaScript SDK. Diagrams for the user stories are shown below.

User stories
User stories for a simple CTF app example

What about security?

Let’s think about how attackers could abuse the functionalities we are trying to create. 

Story 1: Create a challenge

For the first story, the primary concern is that nobody should be able to overwrite a challenge, including its flag. 

Each challenge gets a unique ID. That part is taken care of by Firestore automatically, so an existing challenge will not be overwritten by coincidence. But the ID is exposed in the frontend, and so is the project metadata. Could an attacker modify an existing record, for example its flag, by sending a “PUT” request to the Firestore REST API?

Let’s say we have decided a user must be authenticated to create a challenge, and implemented this by the following Firebase security rule

match /challenges/{challenges} {
      allow read, write: if request.auth != null;
}

Hacking the challenge: overwriting data

This says nothing about overwriting existing data. It also has no restriction on what data the logged in user has access to – you can both read and write to challenges, as long as you are authenticated. Here’s how we can overwrite data in Firestore using set.

Of course, we need to test that! We have created a simple example app. You need to log in (you can register an account if you want to), and go to this story description page: https://quizman-a9f1b.web.app/challenges/challenge.html#wnhnbjrFFV0O5Bp93mUV

screenshot

This challenge has the title “Fog” and description “on the water”. We want to hack this as another user directly in the Chrome dev tools to change the title to “Smoke”. Let’s first register a new user, cyberhakon+dummy@gmail.com and log in. 

If we open devtools directly, we cannot find Firebase or similar objects in the console. That is because the implementation uses SDV v.9 with browser modules, making the JavaScript objects contained within the module. We therefore need to import the necessary modules ourselves. We’ll first open “view source” and copy the Firebase metadata. 

const firebaseConfig = {
            apiKey: "<key>",
            authDomain: "quizman-a9f1b.firebaseapp.com",
            projectId: "quizman-a9f1b",
            storageBucket: "quizman-a9f1b.appspot.com",
            messagingSenderId: "<id>",
            appId: "<appId>",
            measurementId: "<msmtId>"
        };

We’ll simply paste this into the console while on our target challenge page. Next we need to import Firebase to interact with the data using the SDK. We could use SDK v.8 that is namespaced, but we can stick to v.9 using dynamic imports (works in Chrome although not yet a standard): 

import('https://www.gstatic.com/firebasejs/9.6.1/firebase-app.js').then(m => firebase = m)

and 

import('https://www.gstatic.com/firebasejs/9.6.1/firebase-firestore.js').then(m => firestore = m)

Now firestore and firebase are available in the console. 

First, we initalize the app with var app = firebase.initializeApp(firebaseConfig), and the database with var db  = firestore.getFirestore().  Next we pull information about the challenge we are looking at: 

var mydoc = firestore.doc(db, "challenges", "wnhnbjrFFV0O5Bp93mUV");
var docdata = await firestore.getDoc(mydoc);

This works well. Here’s the data returned: 

  • access: “open”
  • active: true
  • description: “on the water”
  • name: “Fog”
  • owner: “IEiW8lwwCpe5idCgmExLieYiLPq2”
  • score: 5
  • type: “ctf”

That is also as intended, as we want all users to be able to read about the challenges. But we can probably use setDoc as well as getDoc, right? Let’s try to hack the title back to “Smoke” instead of “Fog”. We use the following command in the console: 

var output = await firestore.setDoc(mydoc, {name: “Smoke”},{merge: true})

Note the option “merge: true”. Without this, setDoc would overwrite the entire document. Refreshing the page now yields the intended result for the hacker!

screenshot

Improving the security rules

Obviously this is not good security for a very serious capture-the-flag app. Let’s fix it with better security rules! Our current rules allows anyone who is authenticated to read data, but also to write data. Write here is shorthand for create, update, and delete! That means that anyone who is logged in can also delete a challenge. Let’s make sure that only owner can modify documents. We keep the rule for reading to any logged in user, but change the rule for writing to the following:

Safe rule against malicious overwrite:

allow write: if request.auth != null && request.auth.uid == resource.data.owner;

This means that authenticated users UID must match the “owner” field in the challenge. 

Note that the documentation here shows a method that is not safe – these security rules can be bypassed by any authenticated user: https://firebase.google.com/docs/firestore/security/insecure-rules#content-owner-only

(Read 4 January 2022)

Using the following security rules will allow anyone to create, update and delete data because the field “author_id” can be edited in the request directly. The comparison should be done as shown above, against the existing data for update using resource.data.<field_name>. 

service cloud.firestore {
  match /databases/{database}/documents {
    // Allow only authenticated content owners access
    match /some_collection/{document} {
      allow read, write: if request.auth != null && request.auth.uid == request.resource.data.author_uid
    }
  }
}
// Example from link quoted above

There is, however, a problem with the rule marked “SAFE AGAINST MALICIOUS UPDATES” too; it will deny creation of new challenges! We thus need to split the write condition into two new rules, one for create (for any authenticated user), and another one for update and delete operations. 

The final rules are thus: 

allow read, create: if request.auth != null;
allow update, delete: if request.auth != null && request.auth.uid == resource.data.owner;

Story 2: Read the data for a challenge

When reading data, the primary concern is to avoid that someone gets access to the flag, as that would make it possible for them to cheat in the challenge. Security rules apply to documents, not to fields in a document. This means that we cannot store a “secret” inside a document; access is an all or nothing decision. However, we can create a subcollection within a document, and apply separate rules to that subdocument. We have thus created a data structure like this: 

screenshot of firestore data structure

Security rules are hierarchical, so we need to apply rules to /challenges/{challenge}/private/{document}/ to control access to “private”. Here we want the rules to allow only “create” a document under “private” but not to change it, and also not to read it. The purpose of blocking reading of the “private” documents is to avoid cheating. 

But how can we then compare a player’s suggested flag with the stored one? We can’t in the frontend, and that is the point. We don’t want to expose the data in on the client side. 

Story 3: Serverless functions to the rescue

Because we don’t want to expose the flag from the private subcollection in the frontend, we need a different pattern here. We will use Firebase cloud functions to do that. This is similar to AWS’ lambda functions, just running on GCP/Firebase instead. For our Firestore security, the important aspect is that a cloud function running in the same Firebase project has full access to everything in Firestore, and the security rules do not apply to the admin SDK used in functions. By default a cloud function is assigned an IAM role that gives it this access level. For improved security one can change the roles so that you allow only the access needed for each cloud function (here: read data from Firestore). We haven’t done that here, but this would allow us to improve security even further. 

Serverless security engineering recap

Applications don’t magically secure themselves in the cloud, or by using serverless. With serverless computing, we are leaving all the infrastructure security to the cloud provider, but we still need to take care of our workload security. 

In this post we looked at access control for the database part of a simple serverless web application. The authorization is implemented using security rules. These rules can be made very detailed, but it is important to test them thoroughly. Misconfigured security rules can suddenly allow an attacker to bypass your intended control. 

Using Firebase, it is not obvious from the Firebase Console how to set up good application security monitoring and logging. Of course, that is equally important when using serverless as other types of infrastructure, both for detecting attacks, and for forensics after a successful breach. You can set up monitoring Google Cloud Monitoring for Firebase resources, including alerts for events you want to react to. 

As always: basic security principles still hold with serverless computing!

How to discover cyberattacks in time to avoid disaster

Without IT systems, modern life does not exist. Whether we are turning on our dishwasher, ordering food, working, watching a movie or even just turning the lights on, we are using computers and networked services. The connection of everything in networks brings a lot of benefits – but can also make the infrastructure of modern societies very fragile.

Bus stop with networked information boards
Cyber attacks can make society stop. That’s why we need to stop the attackers early in the kill-chain!

When society moved online, so did crime. We hear a lot about nation state attacks, industrial espionage and cyber warfare, but for most of us, the biggest threat is from criminals trying to make money through theft, extortion and fraud. The difference from earlier times is that we are not only exposed to “neighborhood crime”; through the Internet we are exposed to criminal activities executed by criminals anywhere on the planet. 

We see in media reports every week that organizations are attacked. They cause serious disruptions, and the cost can be very high. Over Christmas we had several attacks happening in Norway that had real consequences for many people: 

  • Nortura, a cooperative owned by Norwegian farmers that processes meat and eggs, was hit by a cyber attack that made them take many systems offline. Farmers could not deliver animals for slaughtering, and distribution of meat products to stores was halted. This is still the situation on 2 January 2022, and the attack was made public on 21 December 2021. 
  • Amedia, a media group publishing mostly local newspapers, was hit with ransomware. The next 3 days following the attack on the 28th of December, most of Amedia’s print publications did not come out. They managed to publish some print publications through collaboration with other media houses. 
  • Nordland fylkeskommune (a “fylkeskomune” is a regional administrative level between municapalities and the central government in Norway) and was hit with an attack on 23 December 2021. Several computer systems used by the educational sector have been taken offline, according to media reports. 

None of the reports mentioned above have been linked to the log4shell chaos just before Christmas. The Amedia incident has been linked to the Printer Nightmare vulnerability that caused panic earlier in 2021. 

What is clear is that there is a serious and very real threat to companies from cyber attacks – affecting not only the companies directly, but entire supply chains. The three attacks mentioned above all happened within two weeks. They caused disruption of people’s work, education and media consumption. When society is this dependent on IT systems, attacks like these have real consequences, not only financially, but to quality of life.

This blog post is about how we can improve our chances of detecting attacks before data is exfiltrated, before data is encrypted, before supply chains collapse and consumers get angry. We are not discussing what actions to take when you detect the attack, but we will assume you already have an incident response plan in place.

How an attack works and what you can detect

Let’s first look at a common model for cyber attacks that fit quite well with how ransomware operators execute; the cyber kill-chain. An attacker has to go through certain phases to succeed with an attack. The kill-chain model uses 7 phases. A real attack will jump a bit back and forth throughout the kill-chain but for discussing what happens during the attack, it is a useful mental model. In the below table, the phases marked in yellow will often produce detectable artefacts that can trigger incident response activities. The blue phases of weaponization (usually not detectable) and command & control, actions on objectives (too late for early response) are not discussed further. 

Defensive thinking using a multi-phase attack model should take into account that the earlier you can detect an attack, the more likely you are to avoid the most negative consequences. At the same time, the earlier phases give you detections with more uncertainty, so you do risk initiating response activities that can hurt performance based on false positives. 

Detecting reconnaissance

Before the attack happens, the attacker will identify the victim. For some attacks this is completely automated but serious ransomware attacks are typically human directed and will involve some human decision making. In any case, the attacker will need to know some things about your company to attack it. 

  • What domain names and URL’s exist?
  • What technologies are used, preferably with version numbers so that we can identify potential vulnerabilities to exploit?
  • Who are the people working there, what access levels do they have and what are their email addresses? This can be used for social engineering attacks, e.g. delivering malicious payloads over email. 

These activities are often difficult to detect. Port scans and vulnerability scans of internet exposed infrastructure are likely to drown in a high number of automated scans. Most of these are happening all the time and not worth spending time reacting to. However, if you see unusual payloads attempted, more thorough scans, or very targeted scans on specific systems, this can be a signal that an attacker is footprinting a target. 

Other information useful to assess the risk of an imminent attack would be news about attacks on other companies in the same business sector, or in the same value chain. Also attacks on companies using similar technical set-ups (software solutions, infrastructure providers, etc) could be an early warning signal. In this case, it would be useful to prepare a list of “indicators of compromise” based on those news reports to use for threat hunting, or simply creating new alerts in monitoring systems. 

Another common indicator that footprinting is taking place, is an increase in the number of social engineering attempts to elicit information. This can be over phone, email, privacy requests, responses to job ads, or even in person. If such requests seem unusual it would be useful for security if people would report it so that trends or changes in frequency can be detected. 

Detecting delivery of malicious payloads

If you can detect that a malicious payload is being delivered you are in a good position to stop the attack early enough to avoid large scale damage. The obvious detections would include spam filters, antivirus alerts and user reports. The most common initial intrusion attack vectors include the following: 

  • Phishing emails (by far the most common)
  • Brute-force attacks on exposed systems with weak authentication systems
  • Exploitation of vulnerable systems exposed to the Internet

Phishing is by far the most common attack vector. If you can reliably detect and stop phishing attacks, you are reducing your risk level significantly. Phishing attacks usually take one of the following forms: 

  • Phishing for credentials. This can be username/password based single-factor authentication, but also systems protected by MFA can be attacked with easy to use phishing kits. 
  • Delivery of attachments with malicious macros, typically Microsoft Office. 
  • Other types of attachments with executable code, that the user is instructed to execute in some way

Phishing attacks create a number of artefacts. The first is the spam filter and endpoint protection; the attacker may need several attempts to get the payload past first-line of defences. If there is an increase in phishing detections from automated systems, be prepared for other attacks to slip past the filters. 

The next reliable detection is a well-trained workforce. If people are trained to report social engineering attempts and there is an easy way to do this, user reports can be a very good indicator of attacks. 

For brute-force attacks, the priority should be to avoid exposing vulnerable systems. In addition, creating alerts on brute-force type attacks on all exposed interfaces would be a good idea. It is then especially important to create alerts to successful attempts. 

For web applications, both application logs and WEF logs can be useful. The main problem is again to recognize the attacks you need to worry about in all the noise from automated scans. 

Detecting exploitation of vulnerabilities

Attackers are very interested in vulnerabilities that give them access to “arbitrary code execution”, as well as “escalation of privileges”. Such vulnerabilities will allow the attacker to install malware and other tools on the computer targeted, and take full control over it. The primary security control to avoid this, is good asset management and patch management. Most attacks are exploiting vulnerabilities where a patch exists. This works because many organizations are quite late at patching systems. 

A primary defense against exploitation of known vulnerabilities is endpoint protection systems, including anti-virus. Payloads that exploit the vulnerabilities are recognized by security companies and signatures are pushed to antivirus systems. Such detections should thus be treated as serious threat detections. It is all well and good that Server A was running antivirus that stopped the attack, but what if virus definitions were out of date on Server B?

Another important detection source here would be the system’s audit logs. Did the exploitation create any unusual processes? Did it create files? Did it change permissions on a folder? Log events like this should be forwarded to a tamper proof location using a suitable log forwarding solution. 

To detect exploitation based on log collection, you will be most successful if you are focusing on known vulnerabilities where you can establish patterns that will be recognizable. For example, if you know you have vulnerable systems that cannot be patched for some reason, establishing specific detections for exploitation can be very very valuable. For tips on log forwarding for intrusion detection in Windows, Microsoft has issued specific policy recommendations here

Detecting installation (persistence)

Detecting installation for persistence is usually quite easy using native audit logs. Whenever a new service is created, a scheduled task is created, or a cron job, an audit log entry should be made. Make sure this is configured across all assets. Other automated execution patterns should also be audited, for example autorun keys in the Windows registry, or programs set to start automatically when a user logs in.

Another important aspect is to check for new user accounts on the system. Account creation should thus also be logged. 

On web servers, installation of web shells should be detected. Web shells can be hard to detect. Because of this, it is a good idea to monitor file integrity of the files on the server, so that a new or changed file would be detected. This can be done using endpoint protection systems.

How can we use these logs to stop attackers?

Detecting attackers will not help you unless you take action. You need to have an incident response plan with relevant playbooks for handling detections. This post is already long enough, but just like the attack, you can look at the incident response plan as a multi-phase activity. The plan should cover: 

  1. Preparations (such as setting up logs and making responsibilities clear)
  2. Detection (how to detect)
  3. Analysis and triage (how to classify detections into incidents, and to trigger a formal response, securing forensic evidence)
  4. Containment (stop the spread, limit the blast radius)
  5. Eradication (remove the infection)
  6. Recovery (recover the systems, test the recovery)
  7. Lessons learned (how to improve response capability for the next attack, who should we share it with)

You want to know how to deal with the data you have collected to decide whether this is a problem or not, and what to do next. Depending on the access you have on endpoints and whether production disturbances during incident response are acceptable, you can automate part of the response. 

The most important takeaway is:

Set up enough sensors to detect attacks early. Plan what to do when attacks are detected, and document it. Perform training exercises on simulated attacks, even if it is only tabletop exercises. This will put you in a much better position to avoid disaster when the bad guys attack!