Vibe coding is popular, but how good does “vibe security” compare to throwing traditional SAST tools at your code? “Vibe security review” seems to be a valuable addition to the aresenal here, and performs better than both Sonarqube and Bandit!
Here’s an intentionally poorly programmed Python file (generated by Le Chat with instructions to create a vulnerable and poorly coded text adventure game):
import random
import os

class Player:
    def __init__(self, name):
        self.name = name
        self.hp = 100
        self.inventory = []

    def add_item(self, item):
        self.inventory.append(item)

def main():
    player_name = input("Enter your name: ")
    password = "s3Lsnqaj"
    os.system("echo " + player_name)
    player = Player(player_name)
    print(f"Welcome, {player_name}, to the Adventure Game!")

    rooms = {
        1: {"description": "You are in a dark room. There is a door to the north.", "exits": {"north": 2}},
        2: {"description": "You are in a room with a treasure chest. There are doors to the south and east.", "exits": {"south": 1, "east": 3}},
        3: {"description": "You are in a room with a sleeping dragon! There is a door to the west.", "exits": {"west": 2}},
    }

    current_room = 1

    while True:
        room = rooms[current_room]
        print(room["description"])

        if current_room == 3:
            action = input("Do you want to 'fight' the dragon or 'flee'? ").strip().lower()
            if action == "fight":
                if random.randint(0, 1):
                    print("You defeated the dragon and found the treasure! You win!")
                else:
                    print("The dragon defeated you. Game over!")
                break
            elif action == "flee":
                current_room = 2
                continue

        command = input("Enter a command (go [direction], get [item]): ").strip().lower()

        if command.startswith("go "):
            direction = command.split("go ")[1]
            if direction in room["exits"]:
                current_room = room["exits"][direction]
            else:
                print("You can't go that way.")
        elif command.startswith("get "):
            item = command.split("get ")[1]
            player.add_item(item)
            print(f"You picked up {item}.")
        else:
            print("Invalid command.")

if __name__ == "__main__":
    main()
The code is made unnecessarily complex, and allows user input to be injected directly into the command line. It also has a hardcoded “password” that is not really used for anything. Let’s check the security of this with 3 methods:
Sonarqube Cloud (free version)
Bandit (Python SAST tool)
Github Copilot with GPT-o4
Sonarqube is run with the default ruleset “Sonar Way” with no extra configuration effort. The scan detects “2 security hotspots” and some maintainability issues. A security hotspot is a potential weakness that the SAST tool can’t conclude on, and will require manual review.
The first hotspot is the “password”:
Sonarqube also gives guidance on how to assess if this is dangerous, and how to fix it, which is quite helpful. The other hotspot is “weak cryptography” when the game is using random.randint to choose whether fight or flee is the winning strategy when encountering a dragon – not a (software) security issue. Dragons can be dangerous, though!
Badit did its job – and provides links to more information, including CWE references. Blue is “not good” and red is “bad”.
OK, now for Github Copilot.
Prompt – and then followed by the formatted report!
You are a professional software quality expert and security test engineer. Please review this code and provide an overview of security weaknesses with references to CWE's, and suggested fixes. Analyse the current file. Create the output as a security vulnerability report in markdown format.
Security Vulnerability Report for spaghetti.py
This report provides an analysis of the security weaknesses in the provided spaghetti.py file. Each vulnerability is referenced with its corresponding Common Weakness Enumeration (CWE) and includes suggested fixes.
Vulnerabilities
1. Hardcoded Password
Description: The password is hardcoded in the file (password = "s3Lsnqaj"), making it vulnerable to exposure if the file is shared or accessed by unauthorized users.
Impact: Hardcoded passwords can lead to unauthorized access to sensitive resources.
Suggested Fix:
Store the password securely using environment variables or a secrets management tool.
Example:
import os
password = os.getenv("GAME_PASSWORD")
if not password:
    raise ValueError("Password not set in environment variables")
2. Command Injection
Description: The os.system call uses unsanitized user input (os.system("echo " + player_name)), which can lead to command injection if a malicious user provides crafted input.
Impact: Unvalidated input can lead to crashes, security vulnerabilities, or incorrect program behavior.
Suggested Fix:
Validate and sanitize all user inputs.
Example:
player_name = input("Enter your name: ").strip()
if not player_name.isalnum() or len(player_name) > 50:
    print("Invalid name. Please enter a valid name.")
    return
4. Predictable Randomness
Description: The use of random.randint(0, 1) for critical game logic (e.g., dragon fight outcome) is predictable and not cryptographically secure.
Impact: Predictable randomness can lead to unfair or exploitable outcomes in the game.
Suggested Fix:
Use a cryptographically secure random number generator if randomness is critical.
Example:
import secrets
if secrets.choice([True, False]):
    print("You defeated the dragon and found the treasure! You win!")
else:
    print("The dragon defeated you. Game over!")
5. No Input Length Restriction
Description: The player_name input does not restrict the length, which could lead to buffer overflow or other issues in certain scenarios.
Impact: The program may crash or behave unpredictably when encountering errors.
Suggested Fix:
Add proper exception handling to ensure the program handles errors gracefully.
Example:
try:
    direction = command.split("go ")[1]
    if direction in room["exits"]:
        current_room = room["exits"][direction]
    else:
        print("You can't go that way.")
except KeyError:
    print("Invalid room configuration.")
except Exception as e:
    print(f"An unexpected error occurred: {e}")
Summary
The code contains several vulnerabilities that could compromise its security and reliability. Addressing these issues will improve the robustness and safety of the application.
Recommendations
Replace hardcoded sensitive information with secure storage methods.
Avoid using os.system with unsanitized input; use safer alternatives like subprocess.run.
Validate all user inputs and restrict their length to prevent unexpected behavior.
Use proper error handling to ensure the program does not crash due to invalid input or unexpected conditions.
Consider using cryptographically secure randomness for critical game logic if necessary.
By implementing these fixes, the code will be more secure and maintainable.
Summary
Using Copilot to do a security review and generate a report created the most thorough assessment, which is not surprising. Bandit did quite well and detected the actually dangerous injection vulnerability. Sonarqube provides a nice UI but did not detect the one actually serious vulnerability here.
If you are using the Admin SDK on the server side, you have full access to everything by default. The Firestore security rules do not apply to the Admin SDK. One thing in particular we should be aware of is that the Firesbase admin SDK gives access to management plane functionality, making it possible to change security rules, for example. This is not apparent from the Firebase console or command line tools.
Running Firebase Cloud Functions using the Admin SDK with default permissions can quickly lead to a lot of firefighting. Better get those permissions under control!
In this blog post we dig into a Firebase project through the Google Cloud console and the gcloud command line tool, where we show how to improve the security of our capture-the-flag app by creating specific service accounts and role bindings for a cloud function. We also explore how to verify that a user is signed in using the Firebase Admin SDK.
A threat model for the flag checker
We have created a demo Firebase project with a simple web application at https://quizman-a9f1b.web.app/. This app has a simple CTF function, where a CTF challenge is presented, and players can verify if their identified flag is correct. The data exchange is primarily done using the JavaScript SDK, protected by security rules. For checking the flag, however, we are using a cloud function. If this cloud function has a vulnerability that allows an attacker to take control over it, that attacker could potentially overwrite the “correct flag”, or even change the security rules protecting the JavaScript SDK access.
Here’s a list of threats and potential consequences:
Vulnerability
Exploitation
Impact
RCE vulnerability in code
Attacker can take full control of the Firebase project environment through the admin SDK
Can read/write to private collection (cheat)Can create other resources (costs money)Can reconfigure security rules (data leaks or DoS)
Lack of brute-force protection
Attacker can try to guess flags by automating submission
User can cheatCosts money
Lack of authentication
An unauthenticated user can perform function calls
Costs money in spite of not being a real player of the CTF game
We need to make sure that attackers cannot exploit vulnerabilities to cheat in the program. We also want to protect against unavailability, and abuse that can drive up the cloud usage bill (after all this is a personal project). We will apply a defence-in-depth approach to our cloud function:
Execution of the function requires the caller to be authenticated. The purpose of this is to limit abuse, and to revoke access to users abusing the app.
The Firebase function shall only have read access to FIrestore, preferably only to the relevant collections. This will avoid the ability of an attacker with RCE to overwrite data, or to manage resources in the Firebase project.
For the following events we want to create logs and possibly alerts:
authenticated user verified token
unauthenticated user requested token verification
Requiring the user to be authenticated
First we need to make sure that the person requesting to verify a flag is authenticated. We can use a built-in method of the Firebase admin SDK to do this. This method checks that the ID token received is properly signed, and that it is not expired. The good thing about this approach is that it avoids making a call to the authentication backend.
But what if the token has been revoked? It is possible to check if a token is revoked using either security rules (recommended, cheap), or making an extra call to the authentication backend (expensive, not recommended). Since we are not actively revoking tokens in this app, unless a user changes his/her password, we will not bother with this functionality but if you need it, there is documentation how here: https://firebase.google.com/docs/auth/admin/manage-sessions#detect_id_token_revocation.
We need to update our “check flag workflow” from this:
send flag and challenge ID to cloud function
cloud function queries Firestore based on challenge ID and gets the “correct flag”
cloud function compares submitted flag with the correct flag, and returns {success: true/false} as appropriate
to this slightly more elaborate workflow:
send flag, challenge ID and user token to cloud function
cloud function verifies token ID
If invalid: return 403 (forbidden) // simplified to returning 200 with {success: false}
if valid:
cloud function queries Firestore based on challenge ID and gets the “correct flag”
cloud function compares submitted flag with the correct flag, and returns {success: true/false} as appropriate
The following code snippet shows how to perform the validation of the user’s token:
If the token is valid, we receive a decoded jwt back.
Restricting permissions using IAM roles
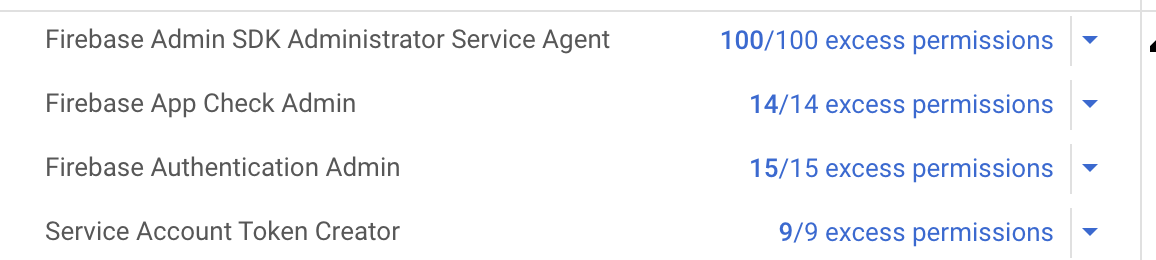
By default, a Firebase function initiated with the Firebase admin SDK has been assigned very powerful permissions. It gets automatically set up with a service account that is named as “firebase-adminsdk-random5chars@project-id.iam.gserviceaccount.com”. The service account itself does not have rights associated with it, but it has role bindings to roles that have permissions attached to it.
If you go into the Google Cloud Console, and navigate to “IAM” under your project, you can look up the roles assigned to a principal, such as your service account. For each role you automatically get an assessment of “excess permissions”; those are permissions available through the role bindings but that are not used in the project. Here’s the default configuration for the service account set up for the Admin SDK:
By default Firebase Cloud Functions run with excessive permissions!
Our Firebase cloud function does not need access to all those permissions. By creating roles that are fit for purpose we can limit the damage an attacker can do if the function is compromised. This is just the same principle in action as when your security awareness training tells you not to run your PC as admin for daily work.
Cloud resources have associated ready-made roles that one can bind a service account to. For Firestore objects the relevant IAM roles are listed here: https://cloud.google.com/firestore/docs/security/iam. We see that there is a viewer role that allows read access to all Firestore resources, called datastore.viewer. We will use this, but be aware it could read all Firestore data in the project, not only the intended objects. Still, we are protecting against deletion, overwriting data, and creation of new resources.
Note that it is possible to create more specific roles. We could create a role that only has permission to read from Firestore entities. We cannot in an IAM role describe exactly which Firestore collection to allow read operations from, but if we create the role flagchecker and assign it the permission datastore.entities.get and nothing else, it is as locked down as we can make it.
To implement this for our cloud function, we create a new service account. This can be done in the Console by going to IAM → Service Accounts → New Service Account. We create the account and assign it the role datastore.viewer.
Our new service account is called quizman-flag-checker.
Now we need to attach this service account to our Firebase function. It is not clear form the Firebase documentation how we can accomplish this, but opening the Google Cloud Console, or using the gcloud command line tool, we can attach our new service account with more restrictive permissions to the Firebase function.
To do this, we go into the Google Cloud console, choose the right project and Compute → Cloud functions. Select the right function, and then hit the “edit” button to change the function. Here you can choose the service account you want to attach to the function.
After changing the runtime service account, we need to deploy the function again. Now the service-to-service authentication is performed with a principal with more sensible permissions; attackers can no longer create their own resources or delete security rules.
Auditing the security configurations of a Firebase function using gcloud
Firebase is great for an easy set-up, but as we have seen it gives us too permissive roles by default. It can therefore be a good idea to audit the IAM roles used in your project.
Key questions to ask about the permissions of a cloud function are:
What is the service account this function is authenticating as?
What permissions do I have for this cloud function?
Do I have permissions that I do not need?
In addition to auditing the configuration, we want to audit changes to the configuration, in particular changes to service accounts, roles, and role bindings. This is easiest done using the log viewer tools in the Google Cloud console.
We’ll use the command line tool gcloud for the auditing, since this makes it possible to automate in scripts.
Service accounts and IAM roles for a Firebase function
Using the Google Cloud command line tool gcloud we can use the command
gcloud functions describe <functionName>
to get a lot of metadata about a function. To extract just the service account used you can pipe it into jq like this:
When we have the service account, we can next check which roles are bound to the account. This query is somewhat complex due to the nested data structure for role bindings on a project (for a good description of gcloud IAM queries, see fabianlee.org):
Running this gives us the following role (as expected): projects/quizman-a9f1b/roles/flagchecker.
Hence, we know this is the only role assigned to this service account. Now we finally need to list the permissions for this role. Here’s how we can do that:
cloud iam roles describe flagchecker --project=quizman-a9f1b --format="value(includedPermissions)”
The output (as expected) is a single permission: datastore.entities.get.
Do you like quizzes or capture the flag (CTF) exercises? Imagine we want to build a platform for creating a capture the flag exercise! We need the platform to present a challenge. When users solve the challenge, they find a “flag”, which can be a secret word or a random string. They should then be able to submit the flag in our CTF platform and check if it is correct or not.
Capture the flag can be fun: looking for a hidden flag whether physically or on a computer
To do this, we need a web server to host the CTF website, and we need a database to store challenges. We also need some functionality to check if we have found the right flag.
Firebase is a popular collection of serverless services from Google. It offers various easy to use solutions for quickly assembling applications for web or mobile, storing data, messaging, authentication, and so on. If you want to set up a basic web application with authentication and data storage without setting up backends, it is a good choice. Let’s create our CTF proof-of-concept on Firebase using Hosting + Firestore for data storage. Good for us, Google has created very readable documentation for how to add Firebase to web projects.
Firestore is a serverless NoSQL database solution that is part of Firebase. There are basically two ways of accessing the data in Firebase:
Directly from the frontend. The data is protected by Firestore security rules
Via an admin SDK meant for use on a server. By default the SDK has full access to everything in Firestore
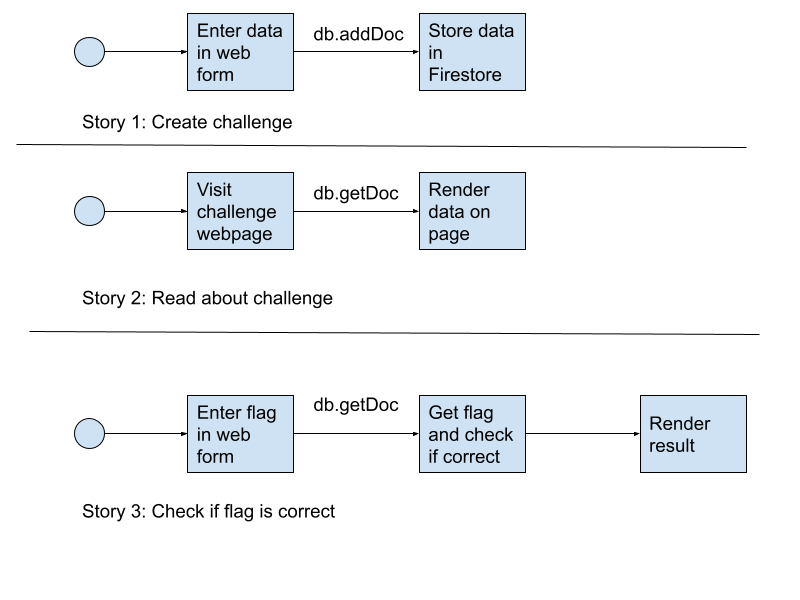
We don’t want to use a server, so we’ll work with the JavaScript SDK for the frontend. Here are the user stories we want to create:
As an organizer I want to create a CTF challenge in the platform and store it in Firebase so other users can find it and solve the challenge
As a player I want to view a challenge so that
As a player I want to create a form to submit a flag to check that it is correct
We want to avoid using a server, and we are simply using the JavaScript SDK. Diagrams for the user stories are shown below.
User stories for a simple CTF app example
What about security?
Let’s think about how attackers could abuse the functionalities we are trying to create.
Story 1: Create a challenge
For the first story, the primary concern is that nobody should be able to overwrite a challenge, including its flag.
Each challenge gets a unique ID. That part is taken care of by Firestore automatically, so an existing challenge will not be overwritten by coincidence. But the ID is exposed in the frontend, and so is the project metadata. Could an attacker modify an existing record, for example its flag, by sending a “PUT” request to the Firestore REST API?
Let’s say we have decided a user must be authenticated to create a challenge, and implemented this by the following Firebase security rule:
match /challenges/{challenges} {
      allow read, write: if request.auth != null;
}
Hacking the challenge: overwriting data
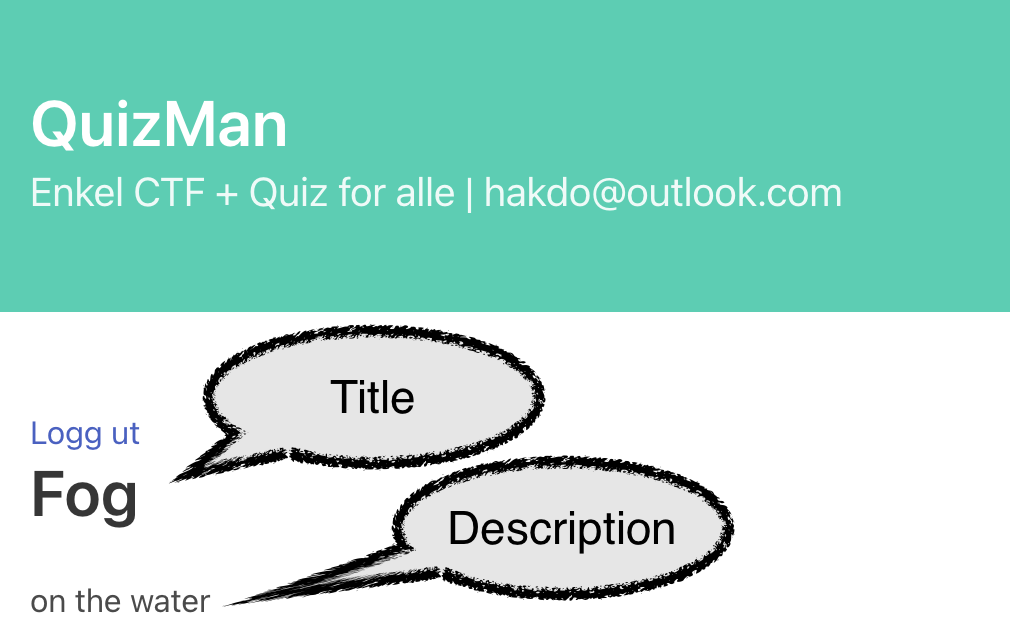
This says nothing about overwriting existing data. It also has no restriction on what data the logged in user has access to – you can both read and write to challenges, as long as you are authenticated. Here’s how we can overwrite data in Firestore using set.
This challenge has the title “Fog” and description “on the water”. We want to hack this as another user directly in the Chrome dev tools to change the title to “Smoke”. Let’s first register a new user, cyberhakon+dummy@gmail.com and log in.
If we open devtools directly, we cannot find Firebase or similar objects in the console. That is because the implementation uses SDV v.9 with browser modules, making the JavaScript objects contained within the module. We therefore need to import the necessary modules ourselves. We’ll first open “view source” and copy the Firebase metadata.
We’ll simply paste this into the console while on our target challenge page. Next we need to import Firebase to interact with the data using the SDK. We could use SDK v.8 that is namespaced, but we can stick to v.9 using dynamic imports (works in Chrome although not yet a standard):
import('https://www.gstatic.com/firebasejs/9.6.1/firebase-app.js').then(m => firebase = m)
and
import('https://www.gstatic.com/firebasejs/9.6.1/firebase-firestore.js').then(m => firestore = m)
Now firestore and firebase are available in the console.
First, we initalize the app with var app = firebase.initializeApp(firebaseConfig), and the database with var db = firestore.getFirestore(). Next we pull information about the challenge we are looking at:
var mydoc = firestore.doc(db, "challenges", "wnhnbjrFFV0O5Bp93mUV");
var docdata = await firestore.getDoc(mydoc);
This works well. Here’s the data returned:
access: “open”
active: true
description: “on the water”
name: “Fog”
owner: “IEiW8lwwCpe5idCgmExLieYiLPq2”
score: 5
type: “ctf”
That is also as intended, as we want all users to be able to read about the challenges. But we can probably use setDoc as well as getDoc, right? Let’s try to hack the title back to “Smoke” instead of “Fog”. We use the following command in the console:
var output = await firestore.setDoc(mydoc, {name: “Smoke”},{merge: true})
Note the option “merge: true”. Without this, setDoc would overwrite the entire document. Refreshing the page now yields the intended result for the hacker!
Improving the security rules
Obviously this is not good security for a very serious capture-the-flag app. Let’s fix it with better security rules! Our current rules allows anyone who is authenticated to read data, but also to write data. Write here is shorthand for create, update, and delete! That means that anyone who is logged in can also delete a challenge. Let’s make sure that only owner can modify documents. We keep the rule for reading to any logged in user, but change the rule for writing to the following:
Safe rule against malicious overwrite:
allow write: if request.auth != null && request.auth.uid == resource.data.owner;
This means that authenticated users UID must match the “owner” field in the challenge.
Using the following security rules will allow anyone to create, update and delete data because the field “author_id” can be edited in the request directly. The comparison should be done as shown above, against the existing data for update using resource.data.<field_name>.
service cloud.firestore {
  match /databases/{database}/documents {
    // Allow only authenticated content owners access
    match /some_collection/{document} {
      allow read, write: if request.auth != null && request.auth.uid == request.resource.data.author_uid
    }
  }
}
// Example from link quoted above
There is, however, a problem with the rule marked “SAFE AGAINST MALICIOUS UPDATES” too; it will deny creation of new challenges! We thus need to split the write condition into two new rules, one for create (for any authenticated user), and another one for update and delete operations.
The final rules are thus:
allow read, create: if request.auth != null;
allow update, delete: if request.auth != null && request.auth.uid == resource.data.owner;
Story 2: Read the data for a challenge
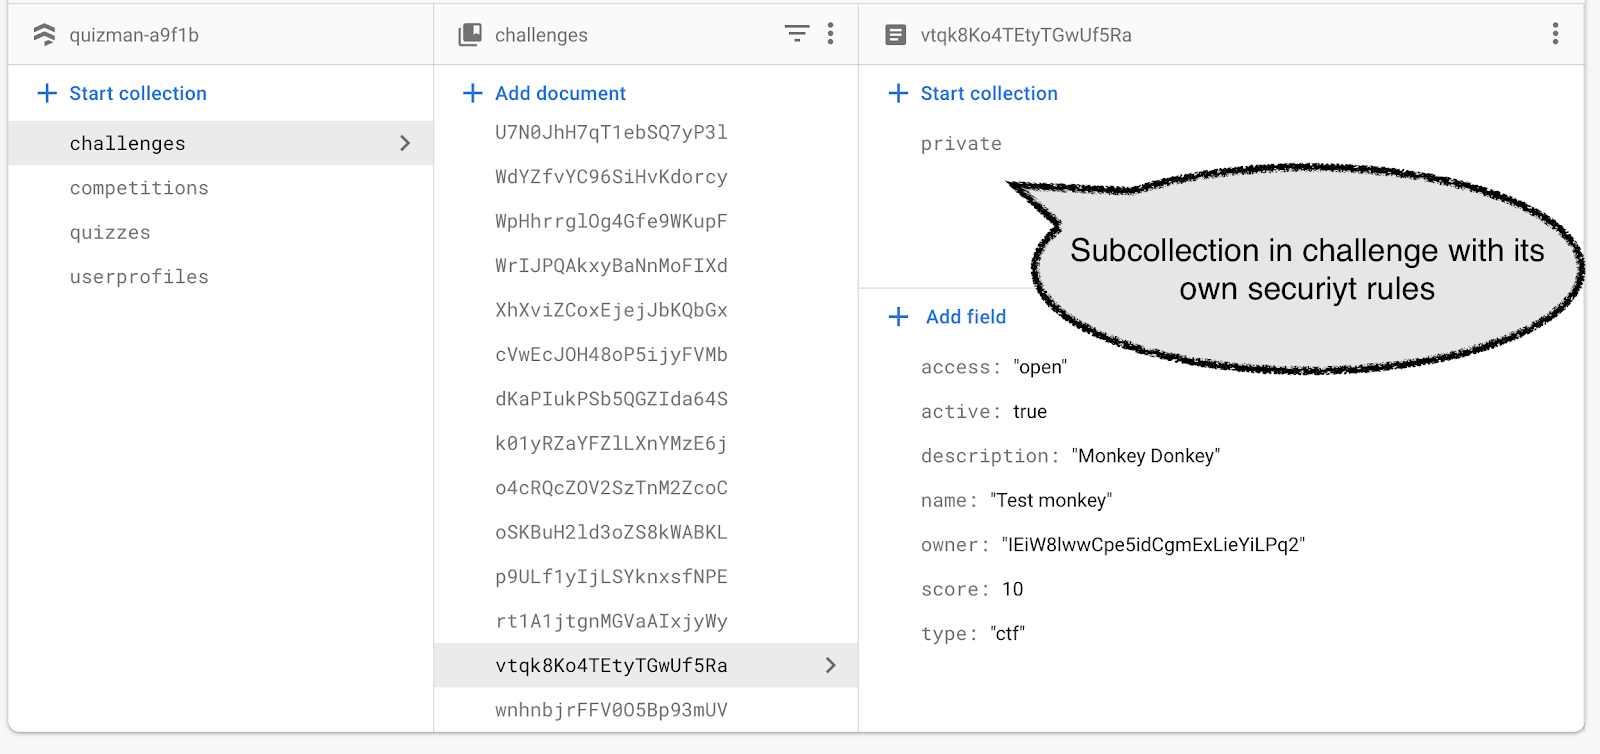
When reading data, the primary concern is to avoid that someone gets access to the flag, as that would make it possible for them to cheat in the challenge. Security rules apply to documents, not to fields in a document. This means that we cannot store a “secret” inside a document; access is an all or nothing decision. However, we can create a subcollection within a document, and apply separate rules to that subdocument. We have thus created a data structure like this:
Security rules are hierarchical, so we need to apply rules to /challenges/{challenge}/private/{document}/ to control access to “private”. Here we want the rules to allow only “create” a document under “private” but not to change it, and also not to read it. The purpose of blocking reading of the “private” documents is to avoid cheating.
But how can we then compare a player’s suggested flag with the stored one? We can’t in the frontend, and that is the point. We don’t want to expose the data in on the client side.
Story 3: Serverless functions to the rescue
Because we don’t want to expose the flag from the private subcollection in the frontend, we need a different pattern here. We will use Firebase cloud functions to do that. This is similar to AWS’ lambda functions, just running on GCP/Firebase instead. For our Firestore security, the important aspect is that a cloud function running in the same Firebase project has full access to everything in Firestore, and the security rules do not apply to the admin SDK used in functions. By default a cloud function is assigned an IAM role that gives it this access level. For improved security one can change the roles so that you allow only the access needed for each cloud function (here: read data from Firestore). We haven’t done that here, but this would allow us to improve security even further.
Serverless security engineering recap
Applications don’t magically secure themselves in the cloud, or by using serverless. With serverless computing, we are leaving all the infrastructure security to the cloud provider, but we still need to take care of our workload security.
In this post we looked at access control for the database part of a simple serverless web application. The authorization is implemented using security rules. These rules can be made very detailed, but it is important to test them thoroughly. Misconfigured security rules can suddenly allow an attacker to bypass your intended control.
Using Firebase, it is not obvious from the Firebase Console how to set up good application security monitoring and logging. Of course, that is equally important when using serverless as other types of infrastructure, both for detecting attacks, and for forensics after a successful breach. You can set up monitoring Google Cloud Monitoring for Firebase resources, including alerts for events you want to react to.
As always: basic security principles still hold with serverless computing!
This is a quick blog post on how to remove some typical vulnerabilities in Django projects.
Even a coffee shop visitor registration app needs to take app security into account
The key aspects we are looking at are:
Threat modeling: thinking through what attackers could do
Secrets management with dotenv
Writing unit tests based on a threat model
Checking your dependencies with safety
Running static analysis with bandit
Threat model
The app we will use as an example here is a visitor registration app to help restaurants and bars with COVID-19 tracing. The app has the following key users:
SaaS administrator: access to funn administration of the app for multiple customers (restaurants and bars)
Location administrator: access to visitor lists for individual location
Personal user: register visits at participating locations, view their own visit history and control privacy settings
Unregistered user: register visits at participating locations, persistent browser session lasting 14 days
We use the keywords of the STRIDE method to come up with quick attack scenarios and testable controls. Note that most of these controls will only be testable with custom tests for the application logic.
Attack type
Scenario
Testable controls
Spoofing
Attacker guesses password
Password strength requirement by Django (OK – framework code)
Lockout after 10 wrong consecutive attempts (need to implement in own code) (UNIT)
Tampering
Repudiation
Attacker can claim not to have downloaded CSV file of all user visits.
CSV export generates log that is not readable with the application user (UNIT)
Information disclosure
Attacker abusing lack of access control to gain access to visitor list
Attacker steals cookie with MitM attack
Attacker steals cookie in XSS attack
Test that visitor lists cannot be accessed from view without being logged in as the dedicated service account. (UNIT)
Test that cookies are set with secure flag. (UNIT OR STATIC)
Test that cookies are set with HTTPOnly flag. (UNIT or STATIC)
Test that there are no unsafe injections in templates (STATIC)
Denial of service
Attacker finds a parameter injection that crashes the application
Check that invalid parameters lead to a handled exception (cookies, form inputs, url parameters)
Elevation of privilege
Attacker gains SaaS administrator access through phishing.
Check that SaaS administrator login requires a safe MFA pattern (UNIT or MANUAL)
Simple threat model for contact tracing app
Secrets management
Django projects get a lot of their settings from a settings.py file. This file includes sensitive information by default, such as a SECRET_KEY used to generate session cookies or sign web tokens, email configurations and so on. Obviously we don’t want to leak this information. Using python-dotenv is a practical way to deal with this. This package allows you to include a .env file with your secrets as environment variables, and then to include then into settings using os.getenv(‘name_of_variable’). This way the settings.py file will not contain any secrets. Remember to add your .env file to .gitignore to avoid pushing it to a repository. In addition, you should use different values for your development and production environment of all secrets.
from dotenv import load_dotenv
load_dotenv()

SECRET_KEY = os.environ.get('SECRET_KEY')
In the code snippet above, we see that SECRET_KEY is no longer exposed. Use the same technique for email server configuration and other sensitive data.
When deploying to production you need to set the environment variables in that environment using a suitable and secure manner to do it. You should avoid storing configurations in files on the server.
Unit tests
As we saw in the threat model, the typical way to fix a security issue is very similar to the typical way you would fix a bug.
Identify the problem
Identify a control that solves the problem
Define a test case
Implement the test and develop the control
In the visitor registration app, an issue we want to avoid is leaking visitor lists for a location. A control that avoids this is an authorisation check in the view that shows the visitor list. Here’s that code.
@login_required()
def visitorlist(request):
    alertmsg = ''
    try:
        thislocation = Location.objects.filter(service_account = request.user)[0]
        if thislocation:
            visits = Visit.objects.filter(location = thislocation).order_by('-arrival')
            chkdate = request.GET.get("chkdate", "")
            if chkdate:
                mydate = datetime.datetime.strptime(chkdate, "%Y-%m-%d")
                endtime = mydate + datetime.timedelta(days=1)
                visits = Visit.objects.filter(location = thislocation, arrival__gte=mydate, arrival__lte=endtime).order_by('-arrival')
                alertmsg = "Viser besøkende for " + mydate.strftime("%d.%m.%Y")
            return render(request, 'visitor/visitorlist.html', {'visits': visits, 'alertmsg': alertmsg})
    except:
        print('Visitor list failed - wrong service account or no service account')
        return redirect('logout')
Here we see that we first require the user to be logged in to visit this view, and then on line 5 we check to see if we have a location where the currently logged in user is registered as a service account. A service account in this app is what we called a “location administrator” in our role descriptions in the beginning of our blog post. It seems our code already implements the required security controls, but to prove that and to make sure we detect it if someone changes that code, we need to write a unit test.
We have written a test where we have 3 users created in the test suite.
class VisitorListAuthorizationTest(TestCase):

    def setUp(self):
        # Create three users
        user1= User.objects.create(username="user1", password="donkeykong2016")
        user2= User.objects.create(username="user2", password="donkeykong2017")
        user3= User.objects.create(username="user3", password="donkeykong2018")
        user1.save()
        user2.save()

        # Create two locations with assigned service accounts
        location1 = Location.objects.create(service_account=user1)
        location2 = Location.objects.create(service_account=user2)
        location1.save()
        location2.save()

    def test_return_code_for_user3_on_visitorlist_is_301(self):
        # Authenticate as user 3
        self.client.login(username='user3', password='donkeykong2018')
        response = self.client.get('/visitorlist/')
        self.assertTrue(response.status_code == 301)

    def test_redirect_url_for_user3_on_visitorlist_is_login(self):
        # Authenticate as user 3
        self.client.login(username='user3', password='donkeykong2018')
        response = self.client.get('/visitorlist/', follow=True)
        self.assertRedirects(response, '/login/?next=/visitorlist/', 301)

    def test_http_response_is_200_on_user1_get_visitorlist(self):
        self.client.login(username='user1', password='donkeykong2016')
        response = self.client.get('/visitorlist/', follow=True)
        self.assertEqual(response.status_code, 200)
Here we are testing that user3 (which is not assigned as “service account” for any location) will be redirected when visiting the /visitorlist/ url.
We are also testing that the security functionality does not break the user story success for the authorized user, user1, who is assigned as service account for location1.
Here we have checked that the wrong user cannot access the URL without getting redirected, and that it works for the allowed user. If someone changes the logic so that the ownership check is skipped, this test will break. If on the other hand, someone changes the URL configuration so that /visitorlist/ no longer points to this view, the test may or may not break. So being careful about changing the inputs required in tests is important.
Vulnerable open source libraries
According to companies selling scanner solutions for open source libraries, it is one of the most common security problems that people are using vulnerable and outdated libraries. It is definitely easy to get vulnerabilities this way, and as dependencies can be hard to trace manually, having a tool to do so is good. For Python the package safety is a good open source alternative to commercial tools. It is based on the NVD (National Vulnerability Database) from NIST. The database is run by pyup.io and is updated every month (free), or you can pay to get updates faster. If you have a high-stakes app it may pay off to go with a commercial option or to write your own dependency checker.
Running it is as easy as
safety check -r requirements.txt
This will check the dependencies in requirements.txt for known vulnerabilities and give a simple output in the terminal. It can be built into CI/CD pipelines too, as it can export vulnerabilities in multiple formats and also give exit status that can be used in automation.
Static analysis with bandit
Static analysis can check for known anti-patterns in code. A popular choice for looking for vulnerabilities in Python code is bandit. It will test for hardcoded passwords, weak crypto and many other things. It will not catch business logic flaws or architectural bad choices but it is a good help for avoiding pitfalls. Make sure you avoid scanning your virtual environment and tests, unless you want a very long report. Scanning your current project is simple:
bandit -r .
To avoid scanning certain paths, create a .bandit file with defined excludes:
[bandit]
exclude: ./venv/,./*/tests.py
This file will exclude the virtual environment in /venv and all files called “tests.py” in all subfolders of the project directory.
A false positive
Bandit doesn’t know the context of the methods and patterns you use. One of the rules it has is to check if you are using the module random in your code. This is a module is a standard Python modules but it is not cryptographically secure. In other words, creating hashing functions or generating certificates based on random numbers generated by it is a bad idea as crypto analysis could create realistic attacks on the products of such generators. Using the random module for non-security purposes on the other hand, is convenient and unproblematic. Our visitor log app does this, and then bandit tells us we did something naughty:
Test results:
        Issue: [B311:blacklist] Standard pseudo-random generators are not suitable for security/cryptographic purposes.
        Severity: Low   Confidence: High
        Location: ./visitor/views.py:59
        More Info: https://bandit.readthedocs.io/en/latest/blacklists/blacklist_calls.html#b311-random
     58          alco = ''
     59          valcode =  ''.join(random.choice(string.ascii_lowercase) for i in range(6))
     60          errmsg = ''
What we see here is the check for cryptographically insecure random numbers. We are using it just to verify that a user knows what they are doing; deleting their own account. The app generates a 6-letter random code that the user has to repeat in text box to delete their account and all associated data. This is not security critical. We can then add a comment # nosec to the line in question, and the scanner will not report on this error again.
Things we will not catch
A static analyser will give you false positives, and there will be dangerous patterns it does not have tests for. There will be things in our threat model we have overlooked, and therefore missing security controls and test requirements. Open source libraries can have vulnerabilities that are not yet in the database used by our scanner tool. Such libraries can also in themselves be malicious by design, or because they have been compromised, and our checks will not catch that. Perhaps fuzzing could, but not always. In spite of this, simple tools like writing a few unit tests, and running some scanners, can remove a lot of weaknesses in an application. Building these into a solid CI/CD pipeline will take you a long way towards “secure by default”.
We have been used to securing web pages with security headers to fend off cross-site scripting attacks, clickjacking attacks and data theft. Many of these headers are now being deprecated and browser may no longer respect these header settings. Instead, we should be using content security policies to reduce the risk to our web content and its users.
Protect your web resources and your users with Content Security Policy headers!
We want to make it even easier to understand how CSP’s can be used, so we have made some demonstrations for the most common directives we should be using. Let us first start with setting the following header:
Content-Security-Policy: default-src ‘self’;
We have created a simple Flask application to demonstrate this. Here’s the view function:
A simple view function setting a CSP header.
Here we are rendering a template “index.html”, and we have set the default-src directive of the CSP to ‘self’. This is a “fallback” directive in case you do not specify other directives for key resources. Here’s what this does to JavaScript and clickjacking, when other directives are missing:
Blocks inline JavaScript (that is, anything inside tags, onclick=… on buttons, etc) and JavaScript coming from other domains.
Blocks media resources from other domains, including images
Blocks stylesheets from external domains, as well as inline style tags (unless explicitly allowed)
Blocking untrusted scripts: XSS
Of course, you can set the default-src to allow those things, and many sites do, but then the protection provided by the directive will be less secure. A lot of legacy web pages have mixed HTML and Javascript in <script> tags or inline event handlers. Such sites often set default-src: ‘self’ ‘unsafe-inline’; to allow such behaviour, but then it will not help protect against common injection attacks. Consider first the difference between no CSP, and the following CSP:
Content-Security-Policy: default-src: ‘self’;
We have implemented this in a route in our Python web app:
Adding the header will help stop XSS attacks.
Let us first try the following url: /xss/safe/hello: the result is injected into the HTML through the Jinja template. It is using the “safe” filter in the template, so the output is not escaped in any way.
Showing that a URL parameter is reflected on the page. This may be XSS vulnerable (it is).
We see here that the word “hello” is reflected on the page. Trying with a typical cross-site-scripting payload: shows us that this page is vulnerable (which we know since there is no sanitation):
No alert box: the CSP directive blocks it!
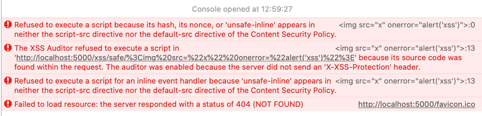
We did not get an alert box here, saying “XSS”. The application itself is vulnerable, but the browser stopped the event from happening due to our Content-Security-Policy with the default-src directive set to self, and no script-src directive allowing unsafe inline scripts. Opening the dev tools in Safari shows us a bunch of error messages in the console:
Error messages in the browser console (open dev tools to find this).
The first message shows that the lack of nonce or unsafe-inline blocked execution. This is done by the web browser (Safari).
Further, we see that Safari activates its internal XSS auditor and detects my payload. This is not related to CSP’s, and is internal Safari behavior: it activates its XSS auditor unless there is an X-XSS-Protection header asking to explicitly disable XSS protection. This is Safari-specific and should not be assumed as a default. The X-XSS-Protection header is a security header that has been used in Internet Explorer, Chrome and Safari but it is currently be deprecated. Edge has removed its XSS Auditor, and Firefox has not implemented this header. Use Content Security Policies instead.
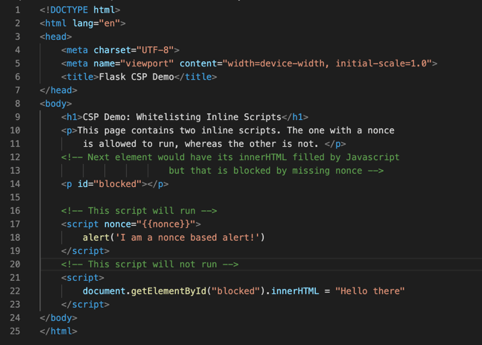
Let’s do an example of an unsafe inline script in our template, using a nonce to allow the inline script. Here’s our code:
Example code showing use of nonce.
Remember to make the nonce unguessable by using a long random number, and make sure to regenerate it each time the CSP is sent to the client – if not, you are not providing much of security protection.
Nonces are only good if they can’t be guessed, and that they are truely used only once.
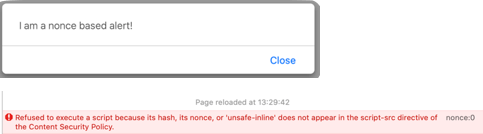
Here we have one script with a nonce included, and one that does not have it included. The nonce’d script will create an alert box, and the script without the nonce tries to set the inner HTML of the paragraph with id “blocked” to “Hello there”. The alert box will be created but the update of the “blocked” paragraph will be blocked by the CSP.
Here’s the HTML template:
A template with two inline scripts. One with an inserted nonce value, one without. Which one will run?
The result is as expected:
Only the nonce’d script will run 🙂
Conclusion: Use CSP’s for protecting against cross-site scripting (XSS) – but keep sanitising as well: defence in depth.
Protecting against common client-side attacks such as XSS and clickjacking can be done using the Content Security Policy header. This should be part of a defense in depth strategy but it is an effective addition to your security controls. As with all controls that can block content, make sure you test thoroughly before you push it to production!
The way we write, deploy and maintain software has changed greatly over the years, from waterfall to agile, from monoliths to microservices, from the basement server room to the cloud. Yet, many organizations haven’t changed their security engineering practices – leading to vulnerabilities, data breaches and lots of unpleasantness. This blog post is a summary of my thoughts on how security should be integrated from user story through coding and testing and up and away into the cyber clouds. I’ve developed my thinking around this as my work in the area has moved from industrial control systems and safety critical software to cloud native applications in the “internet economy”.
What is the source of a vulnerability?
At the outset of this discussion, let’s clarify two common terms, as they are used by me. In very unacademic terms:
Vulnerability: a flaw in the way a system is designed and operated, that allows an adversary to perform actions that are not intended to be available by the system owner.
A threat: actions performed on an asset in the system by an adversary in order to achieve an outcome that he or she is not supposed to be able to do.
The primary objective of security engineering is to stop adversaries from being able to achieve their evil deeds. Most often, evilness is possible because of system flaws. How these flaws end up in the system, is important to understand when we want to make life harder for the adversary. Vulnerabilities are flaws, but not all flaws are vulnerabilities. Fortunately, quality management helps reduce defects whether they can be exploited by evil hackers or not. Let’s look at three types of vulnerabilities we should work to abolish:
Bugs: coding errors, implementation flaws. The design and architecture is sound, but the implementation is not. A typical example of this is a SQL injection vulnerability in a web app.
Design flaws: errors in architecture and how the system is planned to work. A flawed plan that is implemented perfectly can be very vulnerable. A typical example of this is a broken authorization scheme.
Operational flaws: the system makes it hard for users to do things correctly, making it easier to trick privileged users to perform actions they should not. An example would be a confusing permission system, where an adversary uses social engineering of customer support to gain privilege escalation.
Security touchpoints in a DevOps lifecycle
Traditionally there has been a lot of discussion on a secure development lifecycle. But our concern is removing vulnerabilities from the system as a whole, so we should follow the system from infancy through operations. The following touchpoints do not make up a blueprint, it is an overview of security aspects in different system phases.
Dev and test environment:
Dev environment helpers
Pipeline security automation
CI/CD security configuration
Metrics and build acceptance
Rigor vs agility
User roles and stories
Rights management
Architecture: data flow diagram
Threat modeling
Mitigation planning
Validation requirements
Sprint planning
User story reviews
Threat model refinement
Security validation testing
Coding
Secure coding practices
Logging for detection
Abuse case injection
Pipeline security testing
Dependency checks
Static analysis
Mitigation testing
Unit and integration testing
Detectability
Dynamic analysis
Build configuration auditing
Security debt management
Vulnerability prioritization
Workload planning
Compatibility blockers
Runtime monitoring
Feedback from ops
Production vulnerability identification
Hot fixes are normal
Incident response feedback
Dev environment aspects
If an adversary takes control of the development environment, he or she can likely inject malicious code in a project. Securing that environment becomes important. The first principle should be: do not use production data, configurations or servers in development. Make sure those are properly separated.
The developer workstation should also be properly hardened, as should any cloud accounts used during development, such as Github, or a cloud based build pipeline. Two-factor auth, patching, no working on admin accounts, encrypt network traffic.
The CI/CD pipeline should be configured securely. No hard-coded secrets, limit who can access them. Control who can change the build config.
During early phases of a project it is tempting to be relaxed with testing, dependency vulnerabilities and so on. This can quickly turn into technical debt – first in one service, then in many, and at the end there is no way to refinance your security debt at lower interest rates. Technical debt compounds like credit card debt – so manage it carefully from the beginning. To help with this, create acceptable build thresholds, and a policy on lifetime of accepted poor metrics. Take metrics from testing tools and let them guide: complexity, code coverage, number of vulnerabilities with CVSS above X, etc. Don’t select too many KPI’s, but don’t allow the ones you track to slip.
One could argue that strict policies and acceptance criteria will hurt agility and slow a project down. Truth is that lack of rigor will come back to bite us, but at the same time too much will indeed slow us down or even turn our agility into a stale bureaucracy. Finding the right balance is important, and this should be informed by context. A system processing large amounts of sensitive personal information requires more formalism and governance than a system where a breach would have less severe consequences. One size does not fit all.
User roles and stories
Most systems have diffent types of users with different needs – and different access rights. Hackers love developers who don’t plan in terms of user roles and stories – the things each user would need to do with the system, because lack of planning often leads to much more liberal permissions “just in case”. User roles and stories should thus be a primary security tool. Consider a simple app for approval of travel expenses in a company. This app has two primary user types:
Travelling salesmen who need reimbursements
Bosses who will approve or reject reimbursement claims
In addition to this, someone must be able of adding and removing users, granting access to the right travelling salesmen for a given boss, etc. The system also needs an Administrator, with other words.
Let’s take the travelling salesman and look at “user stories” that this role would generate:
I need to enter my expenses into a report
I need to attach documentation such as receipts to this report
I need to be able of sending the report to the boss for approval
I want to see the approval status of my expense report
I need to recieve a notification if my report is not approved
I need to be able of correcting any mistakes based on the rejection
Based on this, it is clear that the permissions of the “travelling salesman” role only needs to give write access to some operations, for data relating to this specific user, and needs read rights on the status of the approval. This goes directly into our authorization concept for the app, and already here generates testable security annotations:
A travelling salesman should not be able to read the expense report of another travelling salesman
A travellign salesman should not be able of approving expense reports, including his own
These negative unit tests could already go into the design as “security annotations” for the user stories.
In addition to user stories, we have abusers and abuse stories. This is about the type of adversaries, and what they would like to do, that we don’t want them to be able of achieving. Let’s take as an example a hacker hired by a competitor to perform industrial espionage. We have the adversary role “industrial espionage”. Here are some abuse cases we can define that relate to motivation of a player rather than technical vulnerabilities:
I want to access all travel reports to map where the sales personnel of the firm are going to see clients
I want to see the financial data approved to gauge the size of their travel budget, which would give me information on the size of their operation
I’d like to find names of people from their clients they have taken out to dinner, so we know who they are talking to at potential client companies
I’d like to get user names and personal data that allow med to gauge if some of the employees could be recurited as insiders or poached to come work for us instead
How is this hypothetical information useful for someone designing an app to use for expense reporting? By knowing the motivations of the adversaries we can better gauge the credibility that a certain type of vulnerability will be attempted exploited. Remember: Vulnerabilities are not the same as threats – and we have limited resources, so the vulnerabilities that would help attackers achieve their goals are more important to remove than those that cannot easily help the adversary.
Vulnerabilities are not the same as threats – and we have limited resources, so the vulnerabilities that would help attackers achieve their goals are more important to remove than those that cannot easily help the adversary.
Coming back to the sources of vulnerabilities, we want to avoid vulnerabilities of three kinds; software bugs, software design flaws, and flaws in operating procedures. Bugs are implementation errors, and the way we try to avoid them is by managing competence, workload and stress level, and by use of automated security testing such as static analysis and similar tools. Experience from software reliability engineering shows that about 50% of software flaws are implementation erorrs – the rest would then be design flaws. These are designs and architectures that do not implement the intentions of the designer. Static analysis cannot help us here, because there may be no coding errors such as lack of exception handling or lack of input validation – it is just the concept that is wrong; for example giving a user role too many privileges, or allowing a component to talk to a component it shouldn’t have access to. A good tool for identificaiton of such design flaws is threat modeling based on a data flow diagram. Make a diagram of the software data flow, break it down into components on a reasonable level, and consider how an adversary could attack each component and what could be the impact of this. By going through an excercise like this, you will likely identify potential vulnerabilities and weaknesses that you need to handle. The mitigations you introduce may be various security controls – such as blocking internet access for a server that only needs to be available on the internal network. The next question then is – how do you validate that your controls work? Do you order a penetration test form a consulting company? That could work, but it doesn’t scale very well, you want this to work in your pipeline. The primary tools to turn to is unit and integration testing.
We will not discuss the techniques for threat modeling in this post, but there are different techniques that can be applied. Keep it practical, don’t dive too deep into the details – it is better to start with a higher level view on things, and rather refine it as the design is matured. Here are some methods that can be applied in software threat modeling:
Often a STRIDE-like approach is a good start, and for the worst case scenarios it can be worthwhile diving into more detail with attack trees. An attack tree is a fault tree applied to adversarial modeling.
After the key threats have been identified, it is time to plan how to deal with that risk. We should apply the defense-in-depth principle, and remeber that a single security control is usually not enough to stop all attacks – because we do not know what all possible attack patterns are. When we have come up with mitigations for the threats we worry about, we need to validate that they actually work. This validation should happen at the lowest possible level – unit tests, integration tests. It is a good idea for the developer to run his or her own tests, but these validations definitely must live in the build pipeline.
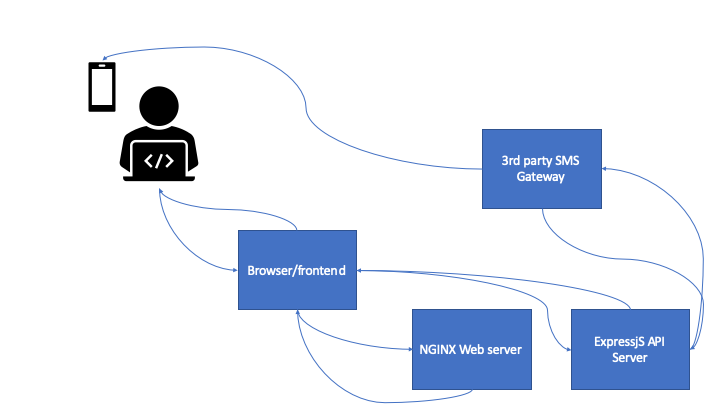
Let’s consider a two-factor authentication flow using SMS-based two-factor authentication. This is the authentication for an application used by politicians, and there are skilled threat actors who would like to gain access to individual accounts.
A simple data flow diagram for a 2FA flow
Here’s how the authentication process work:
User connects to the domain and gets an single-page application loaded in the browser with a login form with username and password
The user enters credentials, that are sent as a post request to the API server, which validates it with stored credentials (hashed in a safe way) in a database. The API server only accepts requests from the right domain, and the DB server is not internet accessible.
When the correct credentials have been added, the SPA updates with a 2fa challenge, and the API server sends a post request to a third-party SMS gateway, which sends the token to the user’s cell phone.
The user enters the code, and if valid, is authenticated. A JWT is returned to the browser and stored in localstorage.
Let’s put on the dark hat and consider how we can take over this process.
SIM card swapping combined wiht a phishing email to capture the credentials
SIM card swapping combined with keylogger malware for password capture
Phishing capturing both password and the second factor from a spoofed login page, and reusing credentials immediately
Create an evil browser extension and trick the user to install it using social engineering. Use the browser extension to steal the token.
Compromise a dependency used by the application’s frontend, to allow man-in-the-browser attacks that can steal the JWT after login.
Compromise a dependency used in the API to give direct access to the API server and the database
Compromise the 3rd party SMS gateway to capture credentials, use password captured with phishing or some other technique
Exploit a vulnerability in the API to bypass authentication, either in a dependency or in the code itself.
As we see, the threat is the adversary getting access to a user account. There are many attack patterns that could be used, and only one of them involves only the code written in the application. If we are going to start planning mitigations here, we could first get rid of the two first problems by not using SMS for two-factor authenticaiton but rather relying on an authenticator app, like Google Authenticator. Test: no requests to the SMS gateway.
Phishing: avoid direct post requests from a phishing domain to the API server by only allowing CORS requests from our own domain. Send a verification email when a login is detected from an unknown machine. Tests: check that CORS from other domains fail, and check that an email is sent when a new login occurs.
Browser extensions: capture metadata/fingerprint data and detect token reuse across multiple machines. Test: same token in different browsers/machines should lead to detection and logout.
Compromised dependencies is a particularly difficult attack vector to deal with as the vulnerability is typically unknown. This is in practice a zero-day. For token theft, the mitigation of using meta-data is valid. In addition it is good practice to have a process for acceptance of third-party libraries beyond checking for “known vulnerabilities”. Compromise of the third-party SMS gateway is also difficult to deal with in the software project, but should be part of a supply chain risk management program – but this problem is solved by removing the third-party.
Exploit a vulnerability in the app’s API: perform static analysis and dependency analysis to minimize known vulnerabilities. Test: no high-risk vulnerabilities detected with static analysis or dependency checks.
We see that in spite of having many risk reduction controls in place, we do not cover everything that we know, and there are guaranteed to be attack vectors in use that we do not know about.
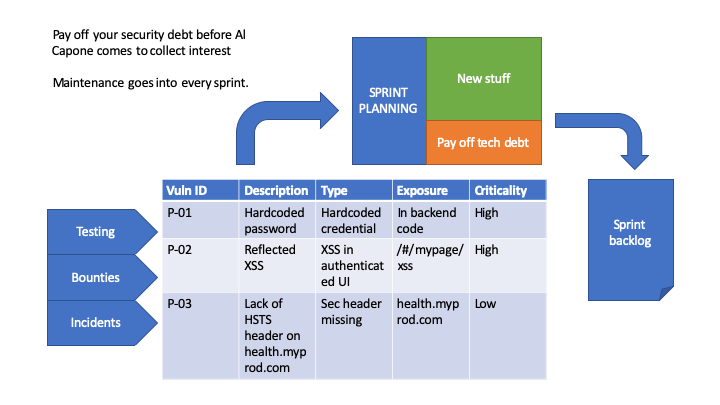
Sprint planning – keeping the threat model alive
Sometimes “secure development” methodologies receive criticims for “being slow”. Too much analysis, the sprint stops, productivity drops. This is obviously not good, so the question is rather “how can we make security a natural part of the sprint”? One answer to that, at least a partial one, is to have a threat model based on the overall architecture. When it is time for sprint planning, there are three essential pieces that should be revisited:
The user stories or story points we are addressing; do they introduce threats or points of attack not already accounted for?
Is the threat model we created still representative for what we are planning to implement? Take a look at the data flow diagram and see if anything has changed – if it has, evaluate if the threat model needs to be updated too.
Finally: for the threats relevant to the issues in the sprint backlog, do we have validation for the planned security controls?
Simply discussing these three issues would often be enough to see if there are more “known uknowns” that we need to take care of, and will allow us to update the backlog and test plan with the appropriate annotations and issues.
Coding: the mother of bugs after the design flaws have been agreed upon
The threat modeling as discussed above has as its main purpose to uncover “design flaws”. While writing code, it is perfectly possible to implement a flawed plan in a flawless manner. That is why we should really invest a lot of effort in creating a plan that makes sense. The other half of vulnerabilities are bugs – coding errors. As long as people are still writing code, and not some very smart AI, errors in code will be related to human factors – or human error, as it is popularly called. This often points the finger of blame at a single individual (the developer), but since none of us are working in vacuum, there are many factors that influence these bugs. Let us try to classify these errors (leaning heavily on human factors research) – broadly there are 3 classes of human error:
Slips: errors made due to lack of attention, a mishap. Think of this like a typo; you know how to spell a word but you make a small mistake, perhaps because your mind is elsewhere or because the keyboard you are typing on is unfamiliar.
Competence gaps: you don’t really know how to do the thing you are trying to do, and this lack of knowledge and practice leads you to make the wrong choice. Think of an inexperienced vehicle driver on a slippery road in the dark of the night.
Malicious error injection: an insider writes bad code on purpose to hurt the company – for example because he or she is being blackmailed.
Let’s leave the evil programmer aside and focus on how to minimize bugs that are created due to other factors. Starting with “slips” – which factors would influence us to make such errors? Here are some:
Not enough practice to make the action to take “natural”
High levels of stress
Lack of sleep
Task overload: too many things going on at once
Outside disturbances (noise, people talking to you about other things)
It is not obvious that the typical open office plan favored by IT firms is the optimal layout for programmers. Workload management, work-life balance and physical working environment are important factors for avoiding such “random bugs” – and therefore also important for the security of your software.
These are mostly “trying to do the right thing but doing it wrong” type of errors. Let’s now turn to the lack of competence side of the equation. Developers have often been trained in complex problem solving – but not necessarily in protecting software from abuse. Secure coding practices, such as how to avoid SQL injection, why you need output escaping and similar types of practical application secuity knowledge, is often not gained by studying computer science. It is also likely that a more self-taught individual would have skipped over such challenges, as the natural focus is on “solving the problem at hand”. This is why a secure coding practice must deliberately be created within an organization, and training and resources provided to teams to make it work. A good baseline should include:
How to protect aginst OWASP Top 10 type vulnerabilities
Secrets management: how to protect secrets in development and production
Detectability of cyber threats: application logging practices
An organization with a plan for this and appropriate training to make sure everyone’s on the same page, will stand a much better chance of avoiding the “competence gap” type errors.
Security testing in the build pipeline
OK, so you have planned your software, created a threat model, commited code. The CI/CD build pipeline triggers. What’s there to stop bad code from reaching your production environment? Let’s consider the potential locations of exploitable bugs in our product:
My code
The libraries used in that code
The environment where my software runs (typically a container in today’s world)
Obviously, if we are trying to push something with known critical errors in either of those locations to production, our pipeline should not accept that. Starting with our own code, a standard test that can uncover many bugs is “static analysis”. Depending on the rules you use, this can be a very good security control but it has limitations. Typically it will find a hardcoded password written as
var password = 'very_secret_password";
but it may not find this password if it isn’t a little bit smart:
var tempstring = 'something_that_may_be_just_a_string";
and yet it may throw an alert on
var password = getsecret();
just because the word “password” is in there. So using the right rules, and tuning them, is important to make this work. Static analysis should be a minimum test to always include.
The next part is our dependencies. Using libraries with known vulnerabilities is a common problem that makes life easy for the adversary. This is why you should always scan the code for external libraries and check if there are known vulnerabilitie sin them. Commercial vendors of such tools often refer to it as “software component analysis”. The primary function is to list all dependencies, check them against databases of known vulnerabilities, and create alerts accordingly. And break the build process based on threshold limits.
Also the enviornment we run on should be secure. When building a container image, make sure it does not contain known vulnerabilities. Using a scanner tool for this is also a good idea.
While static analysis is primarily a build step, testing for known vulnerabilities whether in code libraries or in the environment, should be done regulary to avoid vulnerabilities discovered after the code is deployed from remaining in production over time. Testing the inventory of dependencies against a database of known vulnerabiltiies regulary would be an effective control for this type of risk.
If a library or a dependency in the environment has been injected with malicious code in the supply chain, a simple scan will not identify it. Supply chain risk management is required to keep this type of threat under control, and there are no known trustworthy methods of automatically identifying maliciously injected code in third-party dependencies in the pipeline. One principle that should be followed with respect to this type of threat, however, is minimization of the attack surface. Avoid very deep dependency trees – like an NPM project 25000 dependencies made by 21000 different contributors. Trusting 21000 strangers in your project can be a hard sell.
Another test that should preferably be part of the pipeline, is dynamic testing where actual payloads are tested against injection points. This will typically uncover other vulnerabilities than static analysis will and is thus a good addition. Note that active scanning can take down infrastructure or cause unforeseen errors, so it is a good idea to test against a staging/test environment, and not against production infrastructure.
Finally – we have the tests that will validate the mitigations identified during threat modeling. Unit tests and integration tests for securtiy controls should be added to the pipeline.
Modern environments are usually defined in YAML files (or other types of config files), not by technicians drawing cables. The benefit of this, is that the configuration can be easily tested. It is therefore a good idea to create acceptance tests for your Dockerfiles, Helm charts and other configuration files, to avoid an insider from altering it, or by mistake setting things up to be vulnerable.
Security debt has a high interest rate
Technical debt is a curious beast: if you fail to address it it will compound and likely ruin your project. The worst kind is security debt: whereas not fixing performance issues, removing dead code and so on compunds like a credit card from your bank, leaving vulnerabilities in the code compunds like interest on money you lent from Raymond Reddington. Manage your debt, or you will go out of business based on a ransomware compaign followed by a GDPR fine and some interesting media coverage…
You need to plan for time to pay off your technical debt, in particular your securiyt debt.
Say you want to plan using a certain percentage of your time in a sprint on fixing technical debt, how do you choose which issues to take? I suggest you create a simple prioritization system:
Exposed before internal
Easy to exploit before hard
High impact before low impact
But no matter what method you use to prioritize, the most important thing is that you work on getting rid of known vulnerbilities as part of “business-as-usual”. To avoid going bankrupt due to overwhelming technical debt. Or being hacked.
Sometimes the action you need to take to get rid of a security hole can create other problems. Like installing an update that is not compatible with your code. When this is the case, you may need to spend more resources on it than a “normal” vulnerability because you need to do code rewrites – and that refactoring may also need you to update your threat model and risk mitigations.
Operations: your code on the battle field
In production your code is exposed to its users, and in part it may also be exposed to the internet as a whole. Dealing with feedback from this jungle should be seen as a key part of your vulnerability management program.
First of all, you will get access to logs and feedback from operations, whether it is performance related, bug detections or security incidents. It is important that you feed this into your issue management system and deal with it throughout sprints. Sometimes you may even have a critical situation requiring you to push a “hotfix” – a change to the code as fast as possible. The good thing about a good pipeline is that your hotfix will still go through basic security testing. Hopefully, your agile security process and your CI/CD pipeline is now working so well in symbiosis that it doesn’t slow your hotfix down. In other words: the “hotfix” you are pushing is just a code commit like all others – you are pushing to production several times a day, so how would this be any different?
Another aspect is feedback from incident response. There are two levels of incident response feedback that we should consider:
Incident containment/eradication leading to hotfixes.
Security improvements from the lessons learned stage of incident response
The first part we have already considered. The second part could be improvements to detections, better logging, etc. These should go into the product backlog and be handled during the normal sprints. Don’t let lessons learned end up as a PowerPoint given to a manager – a real lesson learned ends up as a change in your code, your environment, your documentation, or in the incident response procedures themselves.
Key takeaways
This was a long post, here are the key practices to take away from it!
Remember that vulnerabilities come from poor operational practices, flaws in design/architecture, and from bugs (implementation errors). Linting only helps with bugs.
Use threat modeling to identity operational and design weaknesses
All errors are human errors. A good working environment helps reduce vulnerabilities (see performance shaping factors).
Validate mitigations using unit tests and integration tests.