We all use web application for a lot of the business computing we do. That means that we need to care about the security of the applications we use, but this is not always so easy to assess. The traditional approach with sending long security questionnaires won’t get you very far. That’s why I developed a practical checklist approach described below – and there’s a template too for subscribers to this blog!
In 2021 Daniel Miessler had a great blog post on the failings of security questionnaires, and what to do instead, that I also commented on this blog: Vendor Security Management: how to decide if tech is safe (enough) to use. The essence of that thinking is that questionnaires won’t help much, and we should instead worry about whether there is a security program in place, and how they handled the last breach. We can take that though one step further, and create a practical assessment process for SaaS apps we are considering using. The great thing about SaaS apps is we get to test some of the security by using the tech, not only readying claims from others.
By using a checklist and giving it some scores based on security controls we think should be in place, we get a practical approach to assess the security. This won’t give you a complete answer, but it will relatively quickly give you a way to sort the bad from the potentially good.
The way we built this checklist is by dividing our checks into 6 categories. We could have used more, and it is a good idea to tailor the controls you check to what’s important for you. In this example we have used the following categories:
Identity: most breaches happen at the user account level. This is important.
Integrations: API keys leaking and kneeling applications due to DDoS are not fun. Do some checks.
Backups: You definitely want backups.
Data protection: how do you make sure other SaaS users can’t access your data? And what about the SaaS provider?
Logging: if things go wrong, you want to be able of seeing that. If you are blind, you have no security. Logs are critical.
Privacy: not only a legal issue, it is also important for everyone using the app. Colleagues and customers alike.
Let’s take a look at the identity checklist. I have organized each checklist with just a few checkpoints I find important into different sheets in a Google Sheet.
For each line there is a checkpoint, some guidance on how to check, and a dropdown where you can choose the rating “good, weak, or bad”. You can also set it to “not applicable” if you think for some reason that a particular control is not interesting for the current use case. There is also a cell to jot down some notes about your assessment. Below the table I have added some extra assessment advice to make it easier for the user to evaluate what’s more important in the checklist.
For each category, an overall score as a percentage. I don’t think you should use this as a hard threshold but low scores are worse than high scores. I used the following point scale to calculate the overall score:
SCORE = -(number of bad items) + 0.5 x (number of weak items) + (number of good items) / (number of applicable items)
This is not a scientific formula, but it seems to give reasonable spread of the scores. The score is punished by bad results, you get a little bit of credit for weak results, and the “best score” is still 100%.
The Google sheet is free to anyone subscribing to this blog – enjoy 🙂
Excessive security controls when the organization isn’t ready causes friction and destroys value. Learn to identify your organization’s security sweet spot and avoid making the security team the most unpopular group in your company.
Many cybersecurity professionals are good at security but bad at supporting their organizations. When security takes priority over the mission of the organization, your security team may be just as bad for business as the adversary. Security paranoia will often lead to symptoms such as:
Security controls introducing so much friction that people can’t get much done. The best employees give up and become disengaged or leave.
Mentioning IT to people makes them angry. The IT department in general, and security team in particular, is hated by everyone.
IT security policies are full of threats of disciplinary actions, including reporting employees to the police and firing them.
Security when done wrong, can be quite toxic. When security aligns with the culture and mission of the organization, it creates value. When it is abrasive and misaligned, it destroys value. Paranoia is destructive.
An illustrative graph showing that the more secruity you add, the better it is, until it isn’t.
The minimum on the green line on the graph is perhaps the sweet spot for how much security to apply. The difficulty is in finding the sweet spot. It is also not a fixed point on the scale, it is a sliding scale. As the maturity of the organization develops, the sweet spot will move towards the right on the graph. Higher maturity in the organization will allow you to tighten security without destroying value through friction, inefficiencies and misalignment.
As the organization’s workflows and competence matures, it can benefit from tightening security
If you want to kick-start security improvements at work, consider e-mailing this article to your manager with your own take on what your organization’s security sweet spot is
Finding your sweet spot and translating it into security controls
Finding the sweet spot can be challenging. You want to challenge the organization, and help it grow its security maturity, without causing value destruction and disengagement. To achieve this, it is helpful to think about 3 dimensions in your security strategy:
Business process risk
Lean process flow with minimal waste
Capacity for change
If you want to be profitable, keep an engaged workforce, and maintain a high level of security it requires good understanding of cyber risk, that you have established digital work processes that are not getting in the way of the organization’s goals, and a motivated workforce that welcomes change. If you are starting in a completely different place than that, tightening security can easily destory more value than it protects.
Understanding your business process cyber risk is necessary so that you can prioritize what needs to be protected. There are many methods available to asses risks or threats to a system. The result is a list of risks, with a description of possible causes and consequences, an evaluation of likelihood and severity, and suggested security controls or mitigations to reduce the risk. No matter what process you use to create the risk overview, you will need to
Describe the system you are studying and what about it is important to protect.
Identify events that can occur and disturb the system
Evaluate the risk contribution from the elements
Find risk treatments
If the risk to your business value from cyber attacks is very high, it would indicate a need for tighter security. If the risk is not too worrying, less security tightness may be appropriate.
The next step is about your workflows. Do you have work processes with low friction? Securing a cumbersome process is really difficult. Before you apply more security controls, focus on simplifying and optimizing the processes such that they become lean, reliable and joyful to work with. Get rid of the waste! If you are far from being lean and streamlined, be careful about how much security you apply.
The final point is the capacity for change. If the workforce is not too strained, has a clear understanding of the strategic goals, and feel they get rewarded for contributing to the organization’s mission, the capacity for change will typically be high. You can introduce more security measures without destroying value or causing a lot of frustration. If this is not in place, it will be a precursor for going deep on security measures.
To summarize – make sure you have efficient value creation processes and enough capacity for change before you apply a lot of security improvements. If your organization sees a high risk from cyber attacks, but has low process efficiency and limited capacity for change, it would be a good approach to apply basic security controls, and focus on improving the efficiency and capacity for change before doing further tightening. That does mean operating with higher risk than desired for some time, but there is no way to rush change in an organization that is not ready for it.
Security growth through continuous improvement is the way.
Like what you read? Remember to subscribe – and share the article with colleagues and friends!
The balancing act
Consider an engineering company that provides engineering services for the energy sector. They are worried about cyber attacks delaying their projects, which could cause big financial problems. The company is stretched, with most engineers routinely working 60-hour weeks. The workflows are highly dependent on the knowledge of individuals, and not much is documented or standardized. The key IT systems they have are Windows PC’s and Office 365, as well as CAD software.
The CEO has engaged a security consulting company to review the cybersecurity posture of the firm. The consulting report shows that the company is not very robust to cyber attacks, that security awareness is low. The cyber risk level is high.
The CEO, herself an experienced mechanical engineer, introduces a security improvement program that will require heavy standardization, introduction of new administrative software and processes, and will limit the personal freedom in choice of working methods for the engineers. He meets massive opposition, and one of the most senior and well-respected engineering managers says “this is a distraction, we have never seen a cyber attack before. We already work a lot of overtime, and cannot afford to spend time on other things than our core business – which is engineering.”. The other lead engineers support this view.
The CEO calls the consultants up again, and explains that she will have difficulties with introducing a lot of changes, especially in the middle of a big project for one of the key customers. She asks what the most important security measures would be. She gets a list of some key measures that should be implemented, such as least privilege access, multifactor authentication and patching. The CEO then makes a plan to roll out MFA first, and then to focus on working with the engineers to improve the work flows to reduce “waste”. With a step-by-step approach, they have seen some security wins, and after 12 months, the organization is at a much healthier state.
Engineers no longer log on to their PC’s as administrators for daily work
MFA is used everywhere, and 90% of logons are now SSO thorugh Entra ID
They have documented, standardized and optimized some of the work processes that they do often. This has freed up a lot of time, 60-hour weeks are no longer the norm.
The CEO has renewed focus on strategic growth for the company, and everyone knows what the mission is, and what they are trying to achieve. Staff motivation is much higher than before.
Thanks to good organizational understanding of the CEO, and helpful input from the security consultants, the actual security posture is vastly improved, even with few actual security controls implemented. The sweet spot has taken a giant leap to the right on the attacker-paranoia graph, and the firm is set to start its maturity growth journey for improved cybersecurity.
The key take-aways
Don’t apply more security tightness than the organization can take. That will be destructive.
Assess the security needs and capacity by evaluating risk, business process efficiency and capacity for change
Prioritize based on risk and capacity, improve continuously instead of trying to take unsustainable leaps in security maturity
In control networks, where ensuring constant communication and reliable operation is critical, devices are frequently configured to be multihomed. This means they possess connections to multiple separate networks. This approach is favored over traditional routing methods where traffic is passed between networks. The advantage lies in the redundancy and potential performance boost multihoming offers. If one connection malfunctions, the device can seamlessly switch to another, maintaining vital communication within the control network. Additionally, multihoming allows for the possibility of utilizing different networks for specific traffic types, potentially optimizing overall control network performance.
While multihoming offers redundancy and performance benefits in control networks, it introduces security risks if the connected networks are meant to be entirely separate. Here’s why:
Bridging Separate Networks: A multihomed device acts like a bridge between the networks it’s connected to. If these networks should be isolated for security reasons (e.g., a control signal network and a configuration network), the multihomed device can unintentionally create a pathway for unauthorized access. A malicious actor on one network could potentially exploit vulnerabilities on the device to gain access to the otherwise isolated network.
Policy Bypass: Firewalls and other security measures are typically implemented at network borders to control traffic flow. With a multihomed device, traffic can potentially bypass these security controls altogether. This is because the device itself can become a point of entry, allowing unauthorized traffic or data to flow between the networks, even if the network firewalls have proper rules in place.
Increased Attack Surface: Each additional connection point represents a potential vulnerability. With a multihomed device, attackers have more opportunities to exploit weaknesses in the device’s security or configuration to infiltrate one or both networks.
Bypassing firewalls: an example
Consider a system with two networks, where traffic is routed through a firewall. Network B is considered critical for real-time operations and has primarily control system protocols such as Modbus. This network is not encrypted. Network A is primarily used for configuring systems and reprogramming controllers. Most of the traffic is encrypted. Remote access is accepted into Network A, but not Network B.
On the firewall, all traffic between A and B is blocked during normal operation. When a controller in network B needs to be updated, a temporary firewall rule to allow the traffic is added.
Computer 2 i multi-homed and can be used to bypass the firewall
Along comes the adversary, and managed to use remote access to compromise Computer 1, and take over a local administrator account. Then the attacker moves laterally to Computer 2 using the Network A interface, managing to secure an SSH shell to Computer 2. From this shell, the attacker now has access to the control network over the second network interface, and executes a network scan from Computer 2 to identify the devices in Network B. Moving from there, the attacker is able to manipulated devices and network traffic to cause physical disruption, and the plant shuts down.
What are the options?
Your options to reduce the risk from multihomed devices may be limited, but keeping it like the example above is definitely risky.
The ideal solution: Remove any multi-homed setups, and route all traffic through the firewall. This way you have full control of what traffic is allowed. This may not be possible if the latency added is too much but this is a rare constraint.
The micro-segmented solution: Keep the network interfaces but add stateless firewalls on each network card to limit the traffic. Then the multi-homed device becomes its own network segment. Using this to implement a default deny policy will greatly improve the security of the solution.
Device hardening: This should be done for all the solutions, but can also be a solution in its own right. Keep the multi-homed behavior in place, but harden the device so that taking over it becomes really difficult. Disable all unused services, run all applications with minimal privileges, and used the host-based firewall to limit the traffic allowed (both ingress and egress).
Multifactor authentication is a great security control that makes breaking into user accounts much more difficult. But what do you do if you lose your MFA device? You need to set up recovery methods in advance so that you will be able of doing this. Different SaaS providers offer different levels of convenience and security for these use cases. At work, your IT department will be able to help, so we will focus on services we use in our personal lives here.
Prepare for losing your device: set up your backup options
The most common MFA authentication patterns today involve using a cell phone:
A text message (SMS) with a one-time code (this is probably the least secure MFA option)
An authenticator app with either a one-time code, or a push notification
If you lose access to the phone, you will be locked out of your MFA accounts. There are two main ways to avoid this:
Download static recovery codes and store them in a secure location. These codes can be used to get access when your MFA device is lost.
Set up multiple MFA channels, so that you can use an alternative channel if your primary MFA device is gone. Make sure they don’t both depend on the same physical device.
Security Consideration
When setting up backup MFA methods, make sure you don’t set up an insecure method that will allow hackers to easily bypass your MFA step. One such option is to use e-mail for one-time tokens, if the same e-mail address can also be used for password reset. If your e-mail address is compromised, the attacker will have full access to your account.
Example 1: Google Account
Google offers multiple logon choices when you try to log on to your account, including passkeys (Google’s description). Setting up a passkey is a good idea, it improves security and usability at once.
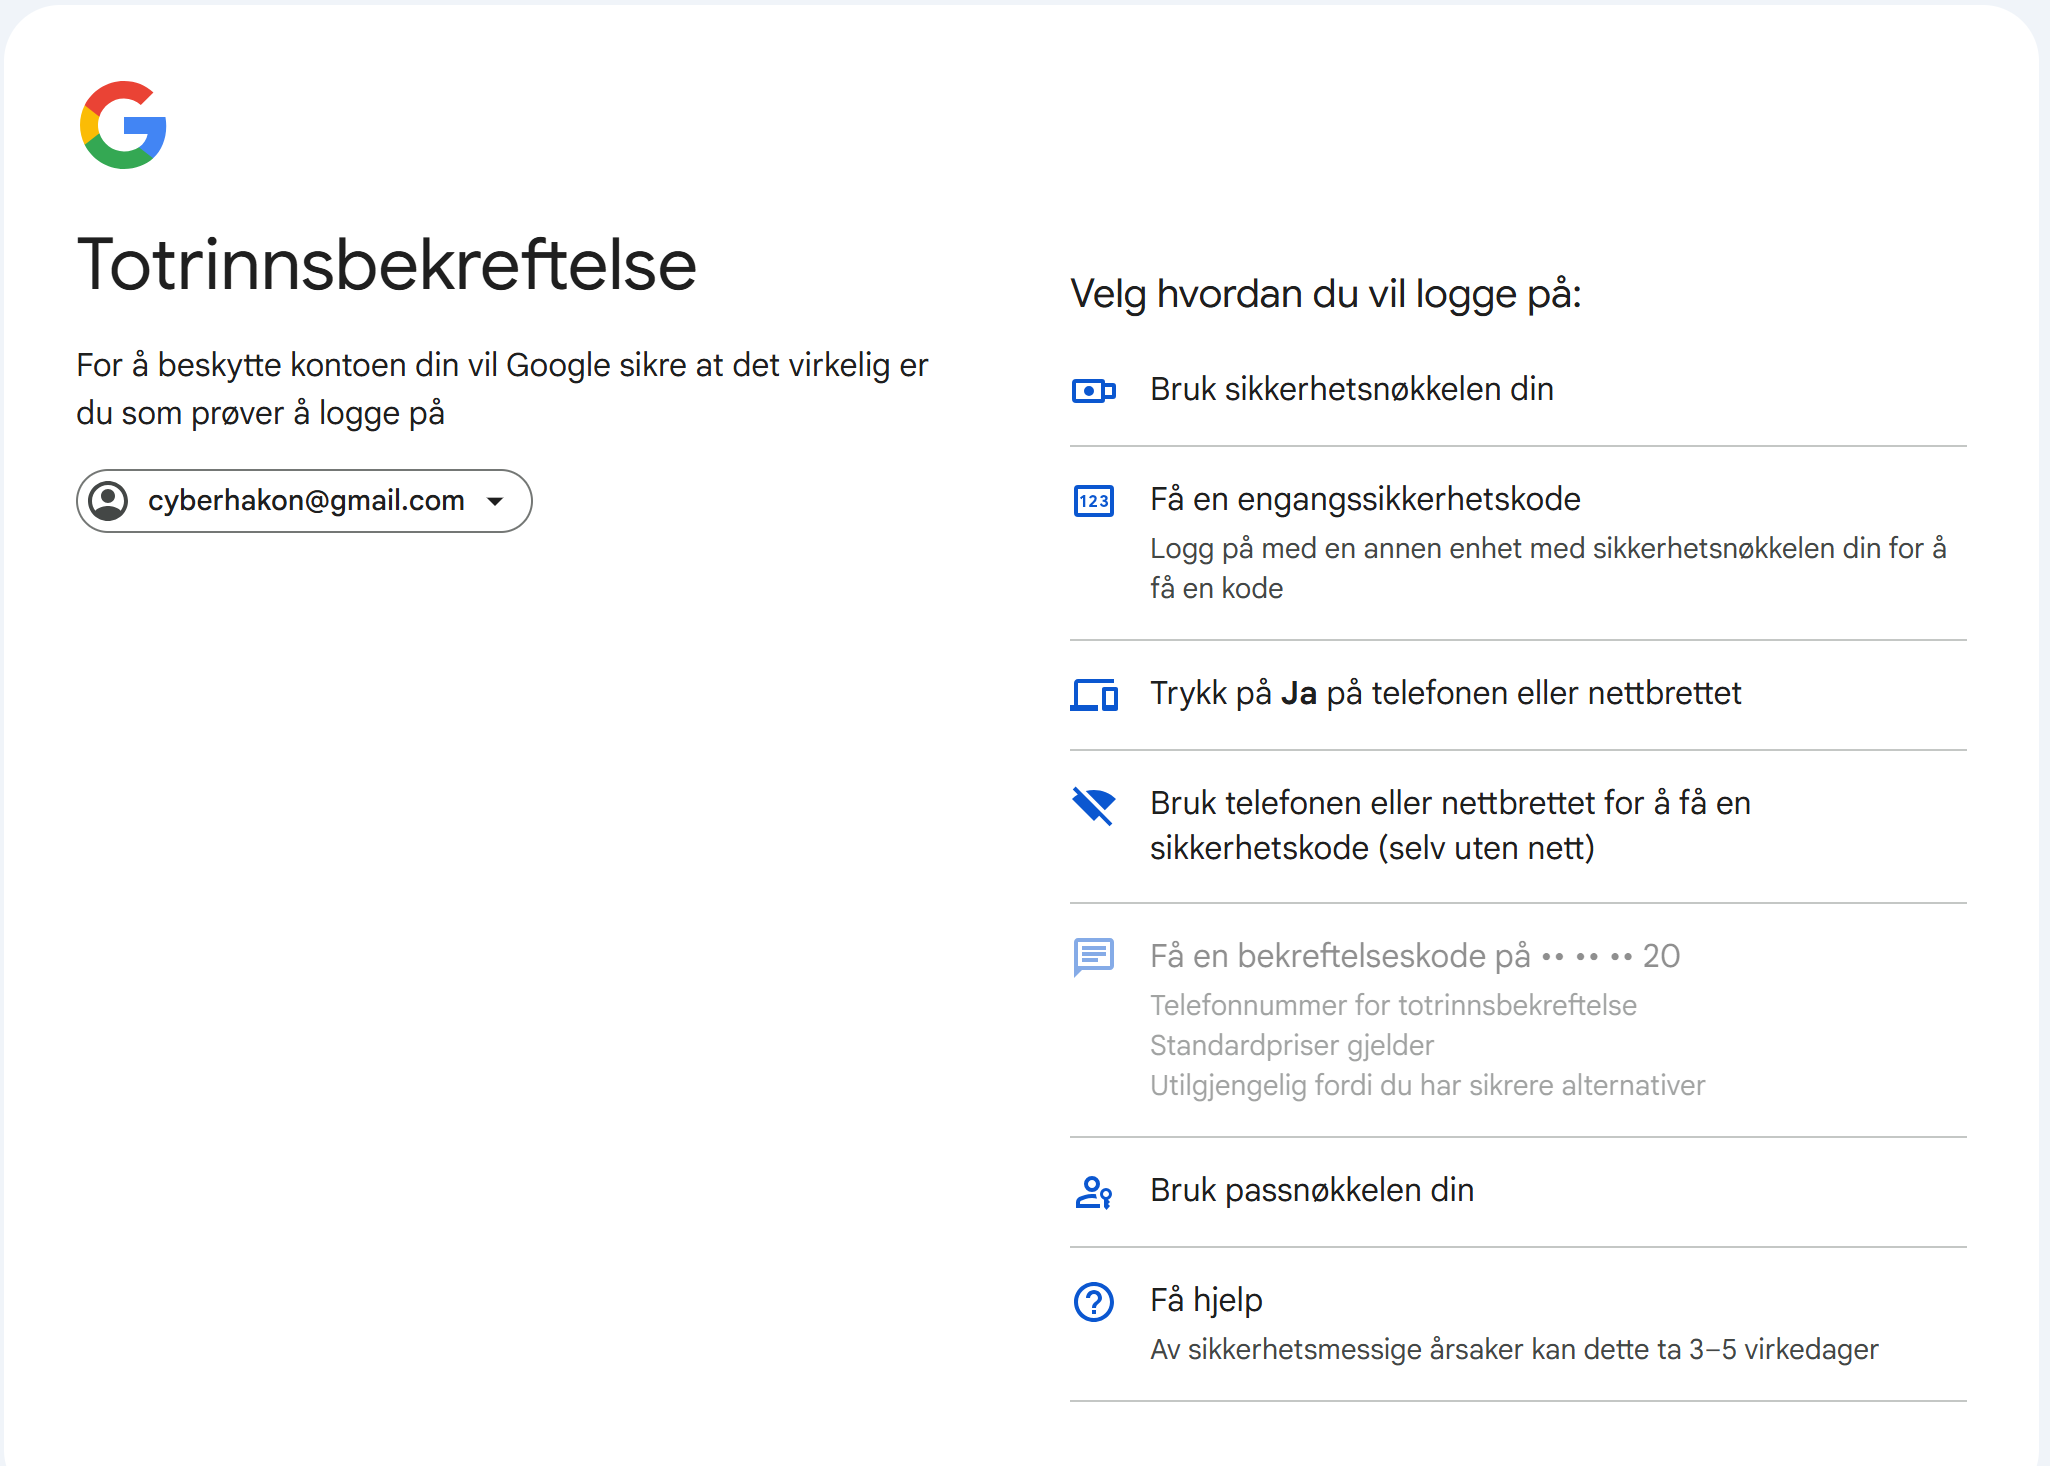
Google offers many MFA options to choose from (I aborted the default way, and clicked “try another way” on the first MFA prompt screen). It allows you to use:
A physical security key
Use a one time code from another device where you are logged into your account
Click “yes” to a pop-up on your phone
Use your phone or tablet to get a one-time code
Use your passkey
The SMS based option is blocked because more secure options have been configured. Most of these depend on my phone, so if I lose that one, I have much less options. I do have an Android tablet I can use as backup.
Example 2: Facebook account
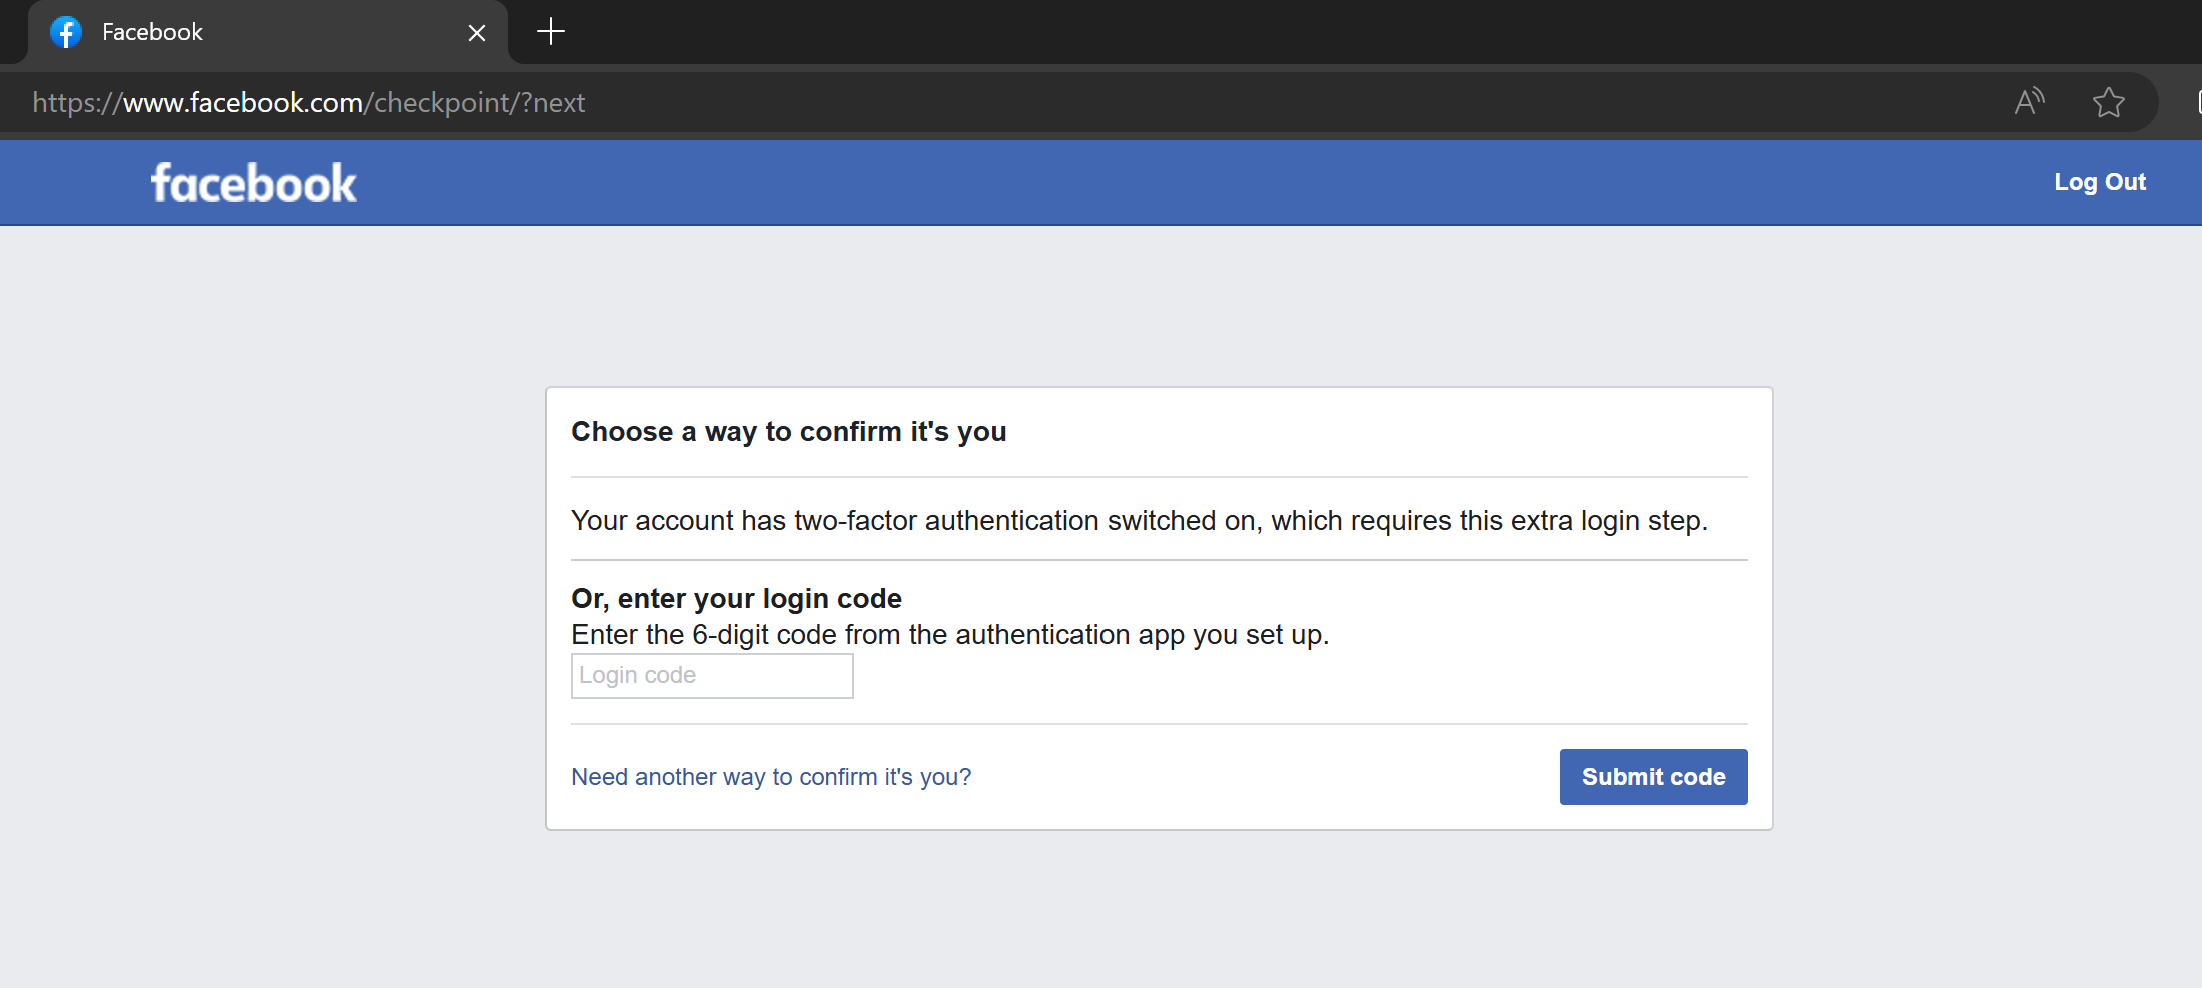
A lot of people use Meta’s apps, including Facebook. Being locked out of a social media account is not a fun experience. I have created a demo Facebook account, and turned on MFA on this account using an authenticator app. Let’s say I have lost my phone, and need to log in. In the below picture I have entered my account’s e-mail address and password, and it is asking for a one-time code from my authenticator.
If you click the “Need another way to confirm it’s you?” link, you get two options:
Approve on a device where you are already logged in
Upload a government ID to get manual help to reclaim the account
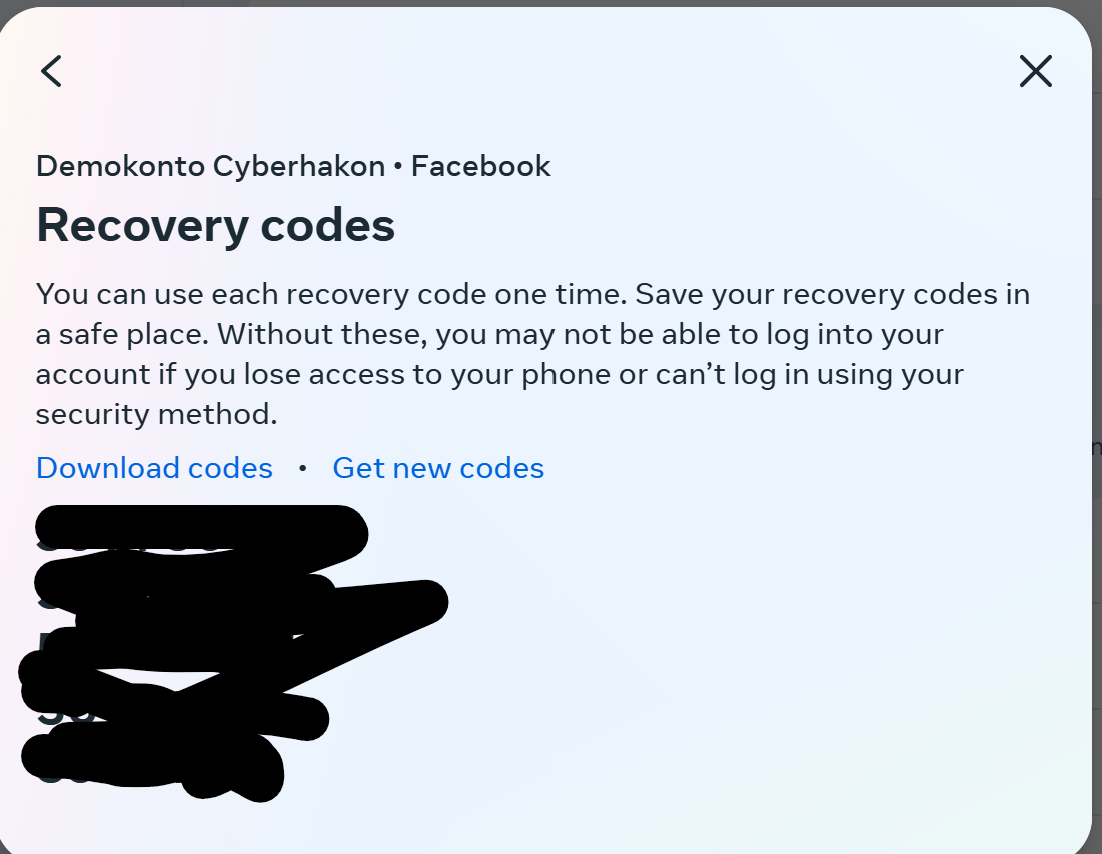
You can also set up multiple authentication methods for MFA on Facebook (and most other big consumer sites). They also offer creating recovery codes that you can save for the rainy day when you lose your phone.
Now, let’s try to log in again and pretend we have lost the authenticator. We don’t get an option to use recovery codes, it looks like we still have to upload an ID to support. But: if you enter one of the 8-digit recovery codes in the field asking for the 6-digit one-time code, it works and you are logged in!
MFA Anti-Lockout Recipe
OK, so if you enable MFA without doing any preparations for losing your device, you will be in trouble the day your phone is lost. Here’s what to do:
Set up MFA with your primary method. Use the most secure option available that you are able to use.
Set up a backup MFA method. Try to avoid e-mail and SMS if you can.
Download and store recovery codes somewhere safe if offered in the app. The best place is probably a password manager.
Set up notifications for unknown logins, for example from new devices or new countries, if offered. This will help you react quickly if something unexpected happens.
Happy surfing without getting locked out of your account because MFA got in the way!
Microsoft has received a lot of attention for its Copilot for Security. Some of it good, some of it bad. Irrespective of that, using AI to help with finding evil in the stack of logs is tempting.
Let’s try to do that. We set up a Linux server exposed to the Internet with SSH open, with password authentication. We create a user called admin with the password donaldtrump2024. We also make the /etc/passwd file writable for all users, but turn on file access logging for this file. Then we wait.
Creating a very insecure Linux server
We set up a spot instance on Google’s compute engine service. This instance is running Debian and is exposed to the Internet. We did the following things:
Created a new standard user with username admin
Set a password for the user to donaldtrump2024
Allowed ssh login with password
Set chmod 777 on /etc/passwd
Installed auditd
Set auditd to monitor for changes to /etc/passwd
Now it should be easy to both get access to the box using a brute-force attack, and then to elevate privileges.
The VM was set up a spot instance since I am greedy, and relatively quickly shut down. Might have been a mistake, will restart it and see if we can keep it running for a while.
Command line hunting
Since this is a honeypot, we are just waiting for someone to be able to guess the right password. Perhaps donaldtrump2024 is not yet in enough lists that this will go very fast, but we can do our own attack if the real criminals don’t succeed.
To find successful logins we can use the wtmb file with the utility command “last”. After being up for 30 minutes on the Internet, there has been only one attempt at logging in with the user ‘admin’. It is interesting to see which users the attackers are trying:
This gives us the following top 5 list of attempted usernames:
root (20)
ubuntu (6)
xu (4)
vps (4)
steam (4)
There are in all 53 different user names attempted and 101 failed login attempts. Still no success for our admin user.
To sum it up – to look at successful login attempts, you can use the command “last”. Any user can use this one. To look at failed login attempts, you can use the command “lastb”, but you need sudo rights for that.
We expect the bad guys to look for privilege escalation opprotunities if they breach our server. The writable passwd should be pretty easy to find. Since we have set up auditd to track any file accesses we should be able to quickly find this simply by using the utility ausearch with parameters
ausearch -k <keyword>
Simulating the attack
Since we don’t want to wait for a real attacker to finally find our pot of honey, we’ll need to do the dirty deeds ourselves. We will try to log in repeatedly with the wrong password, then get the right password using SSH. When we get in, we will locate the /etc/passwd, check its permissions, and then edit it to become root. Then we see how we can discover that this happened. First, the attack:
Then, we check if we have sudo rights with sudo -l. We don’t have that. Then we check permissions on /etc/passwd… and.. bingo!
ls -la /etc/passwd
-rwxrwxrwx 1 root root 1450 Jun  6 17:02 /etc/passwd
The /etc/passwd file is writeable for all! We change the last line in the file to
admin:x:0:0:root:/root:/bin/sh
After logging out, we can not get back in again! Likely because the root user is blocked from logging in with ssh, which is a very good configuration. (Fixing this by logging in with my own account, and setting the /etc/passwd back to its original state, then doing the attack again). OK, we are back to having edited the /etc/passwd 🙂
We now escalate with using su to log in as ourselves after editing the /etc/passwd file, to avoid being blocked by sshd_config.
OK, we are now root on the server. Mission accomplished.
Hunting the bad guys with AI
Let’s try to ask Gemini (the free version) to try to find the evil in the logs. First we get the lastb and last logs, and ask Gemini to identify successful brute-force attacks:
Here's a log of failed logons on a linux server:
admin    ssh:notty    194.169.175.36   Thu Jun  6 18:14 - 18:14  (00:00)
ant      ssh:notty    193.32.162.38    Thu Jun  6 18:14 - 18:14  (00:00)
ant      ssh:notty    193.32.162.38    Thu Jun  6 18:14 - 18:14  (00:00)
visitor  ssh:notty    209.38.20.190    Thu Jun  6 18:13 - 18:13  (00:00)
visitor  ssh:notty    209.38.20.190    Thu Jun  6 18:13 - 18:13  (00:00)
admin    pts/1                         Thu Jun  6 18:12 - 18:12  (00:00)
admin    ssh:notty    88.216.90.202    Thu Jun  6 18:10 - 18:10  (00:00)
admin    ssh:notty    88.216.90.202    Thu Jun  6 18:10 - 18:10  (00:00)
ansibleu ssh:notty    193.32.162.38    Thu Jun  6 18:07 - 18:07  (00:00)
ansibleu ssh:notty    193.32.162.38    Thu Jun  6 18:07 - 18:07  (00:00)
ubnt     ssh:notty    209.38.20.190    Thu Jun  6 18:06 - 18:06  (00:00)
ubnt     ssh:notty    209.38.20.190    Thu Jun  6 18:06 - 18:06  (00:00)
admin    ssh:notty    88.216.90.202    Thu Jun  6 18:05 - 18:05  (00:00)
admin    ssh:notty    88.216.90.202    Thu Jun  6 18:05 - 18:05  (00:00)
user     ssh:notty    85.209.11.27     Thu Jun  6 18:04 - 18:04  (00:00)
user     ssh:notty    85.209.11.27     Thu Jun  6 18:04 - 18:04  (00:00)
ibmeng   ssh:notty    193.32.162.38    Thu Jun  6 18:01 - 18:01  (00:00)
ibmeng   ssh:notty    193.32.162.38    Thu Jun  6 18:01 - 18:01  (00:00)
root     ssh:notty    209.38.20.190    Thu Jun  6 17:59 - 17:59  (00:00)
admin    ssh:notty    88.216.90.202    Thu Jun  6 17:59 - 17:59  (00:00)
admin    ssh:notty    88.216.90.202    Thu Jun  6 17:59 - 17:59  (00:00)
admin    ssh:notty    88.216.90.202    Thu Jun  6 17:59 - 17:59  (00:00)
admin    ssh:notty    88.216.90.202    Thu Jun  6 17:59 - 17:59  (00:00)
admin    ssh:notty    88.216.90.202    Thu Jun  6 17:59 - 17:59  (00:00)
admin    ssh:notty    193.32.162.38    Thu Jun  6 17:54 - 17:54  (00:00)
masud02  ssh:notty    209.38.20.190    Thu Jun  6 17:53 - 17:53  (00:00)
masud02  ssh:notty    209.38.20.190    Thu Jun  6 17:52 - 17:52  (00:00)
admin    ssh:notty    193.32.162.38    Thu Jun  6 17:48 - 17:48  (00:00)
auser    ssh:notty    209.38.20.190    Thu Jun  6 17:46 - 17:46  (00:00)
auser    ssh:notty    209.38.20.190    Thu Jun  6 17:46 - 17:46  (00:00)
radio    ssh:notty    193.32.162.38    Thu Jun  6 17:41 - 17:41  (00:00)
radio    ssh:notty    193.32.162.38    Thu Jun  6 17:41 - 17:41  (00:00)
root     ssh:notty    209.38.20.190    Thu Jun  6 17:39 - 17:39  (00:00)
root     ssh:notty    193.32.162.38    Thu Jun  6 17:35 - 17:35  (00:00)

Here's a list of successful ones:
cyberhak pts/2        35.235.241.16    Thu Jun  6 18:16   still logged in
admin    pts/1        88.216.90.202    Thu Jun  6 18:10    gone - no logout
cyberhak pts/0        35.235.244.33    Thu Jun  6 18:07   still logged in
admin    pts/3        88.216.90.202    Thu Jun  6 17:59 - 18:05  (00:05)
cyberhak pts/0        35.235.244.32    Thu Jun  6 17:52 - 18:05  (00:12)
cyberhak pts/1        35.235.244.32    Thu Jun  6 17:39 - 18:01  (00:21)
cyberhak pts/0        35.235.244.34    Thu Jun  6 17:32 - 17:48  (00:15)
reboot   system boot  6.1.0-21-cloud-a Thu Jun  6 17:31   still running
cyberhak pts/5        35.235.244.33    Thu Jun  6 17:23 - 17:26  (00:03)
cyberhak pts/3        35.235.244.32    Thu Jun  6 17:19 - 17:26  (00:07)
cyberhak pts/2        35.235.241.16    Thu Jun  6 17:14 - 17:26  (00:11)
cyberhak pts/1        35.235.244.34    Thu Jun  6 17:07 - 17:24  (00:16)
cyberhak pts/0        35.235.244.32    Thu Jun  6 17:01 - 17:16  (00:14)
reboot   system boot  6.1.0-21-cloud-a Thu Jun  6 16:53 - 17:26  (00:33)

Can you find successful brute-force logins? For which user was this? Did the IP addresses vary during the attack? How long did the attack last before the attacker succeeded?
Gemini successfully identifies the attack, although confounds different attackers:
Yes, there are successful brute-force logins in this log. Here’s a breakdown:
User: The successful logins were for the user “admin“.
IP Addresses: The attacker used multiple IP addresses during the attack. These include 35.235.241.16, 35.235.244.32, and 35.235.244.33. This suggests a coordinated attack or the use of a botnet.
Attack Duration: It’s difficult to pinpoint the exact start time of the attack, but there are failed attempts for “admin” as early as 17:35 on Thu Jun 6. The first successful login for “admin” appears at 17:52 on Thu Jun 6. This means the attack likely lasted for at least 17 minutes.
Here are the lines in the log that show successful logins:
cyberhak pts/2 35.235.241.16 Thu Jun 6 18:16 still logged in
cyberhak pts/0 35.235.244.33 Thu Jun 6 18:07 still logged in
admin pts/3 88.216.90.202 Thu Jun 6 17:59 - 18:05 (00:05) (This user “admin” successfully logged in at some point between 17:59 and 18:05)
Even though the logs don’t show the exact method used for the brute-force attack, the repeated failed attempts with various usernames suggest an attempt to crack passwords.
Looking for privilege escalation
OK, we have a likely breach from the user “admin”. Did the user try to escalate privileges?
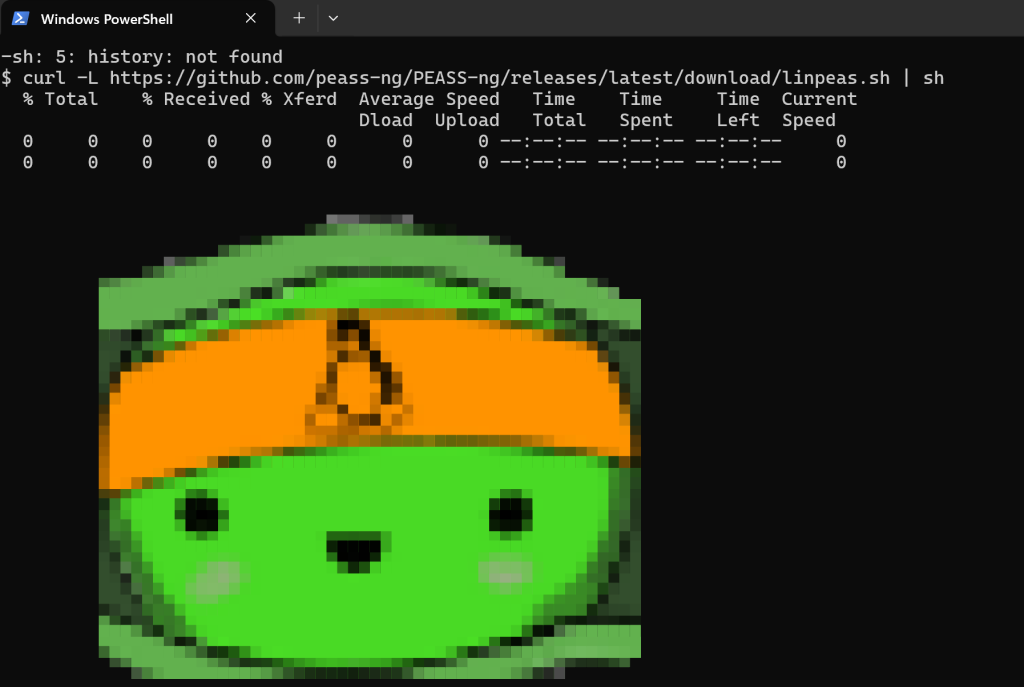
The first thing an attacker would do to achieve privilege escalation is to find vulnerabilities to exploit. Let’s run an enumeration script to see if we find anything exploitable first, got get a hunting hypothesis in place: https://github.com/peass-ng/PEASS-ng/tree/master/linPEAS.
Piping linpeas script to bash to find privesc vulns
And we find that /etc/passwd is writeable – when linpeas marks something with yellow background, it claims that it has a 95% chance of being exploitable to escalate privileges. It is an easy thing to check, so the hacker probably found it too!
Easiest way to check now is of course just to read the file! Doing that, we see that indeed, there is an entry giving the user “admin” root privileges:
Let’s now provide the audit log to Gemini, and ask it to analyse it.
The logs don’t conclusively show that the user “admin” edited the “/etc/passwd” file. Here’s what we can see:
User “cyberhakon” with root privileges (UID=0) opens the “/etc/passwd” file with vim (audit type: SYSCALL, msg: audit(1717870666.722:125)).
There’s a following syscall fchmod (audit type: SYSCALL, msg: audit(1717870666.730:126)) which suggests a permission change attempt, but it doesn’t confirm a modification to the file itself.
However, there are some interesting points:
User “cyberhakon” logs in with root privileges twice using su and sudo before this event.
User “admin” then logs in successfully via SSH.
It’s a possibility that “cyberhakon” might have intended to edit the “/etc/passwd” file to grant “admin” escalated privileges, but due to missing logs or them being outside the timeframe provided, we cannot be certain.
Here’s what you can do to investigate further:
Check the access logs of the FTP server or SSH server to see if there were any uploads or modifications to the “/etc/passwd” file around the timeframe.
Analyze the changes made to the “/etc/passwd” file. You can use tools like passwd -S <username> to view password information or check timestamps of the file itself.
Look for any additional logs related to user privilege changes. This might involve looking at authorization logs or security software logs.
Remember, these are just suggestions, and the best course of action might depend on your specific system and security policies.
OK, so from the file, Gemini does not conclude anything directly, but clearly understands what to look for, and gives hints for further investigation steps. Let’s check when passwd was last modified first:
From the stat command we see that the file was last modified at 18:33:30. Let’s see if admin was logged in then. Using the “last” command, we get that “admin” logged in at 18:21, and is still logged on when this is checked (at 18:59).
Since we have also configured audit logging, we can search for the key we set for write attempts to /etc/passwd. We then find that at 18:33 was modified with vim with a user with uid=1005, and starting in the working directory /home/admin. In other words, it is highly likely that the user “admin” escalated privileges by editing /etc/passwd at 18:33.